Continuous ...
Introduction to Active Directory Sites
An Active Directory site is a physical subnet that is connected using a reliable, high-bandwidth connection. An Active Directory
site structure represents the physical structure of your network and
is separate from the logical structure of the network, which is
represented by forests, domains, and organizational units. Sites are
used to designate replication boundaries and isolate logon authentication traffic between physical network locations.
A single Active Directory site can contain resources from different Active Directory domains, and a single Active Directory domain can exist across different Active Directory sites.
You should create additional Active Directory sites to control Active Directory replication traffic and to isolate logon traffic.
Remember, an Active Directory site is connected using reliable, high-bandwidth connection. Each site should have at least one Active Directory Domain Controller and one Global Catalog, to avoid using low bandwidth WAN connection for Active Directory replication traffic and to isolate logon traffic.
Each Active Directory site should have at least one DNS server and one DHCP server for name resolution and to assign automatic IP setting to computers.How to create an Active Directory site
Active Directory Sites can be created using the Active Directory Sites and Services snap-in (Start > Programs > Administrative Tools > Active Directory Sites and Services). Windows Server 2003 creates the first site automatically when AD is installed.
The default name of the first site is "Default-First-Site-Name" and
includes all the domain controllers. It is possible to rename the
default site, but it should never be deleted. Additional sites must be
created manually.
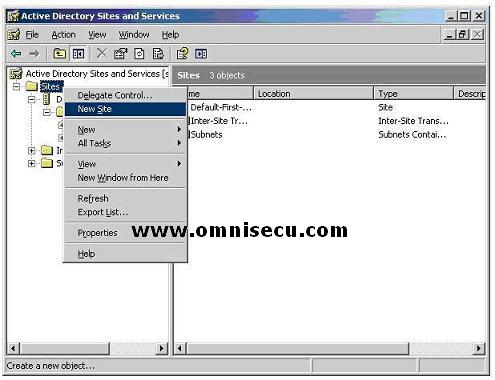
Right Click Sites and select "New Site" from the popup menu.
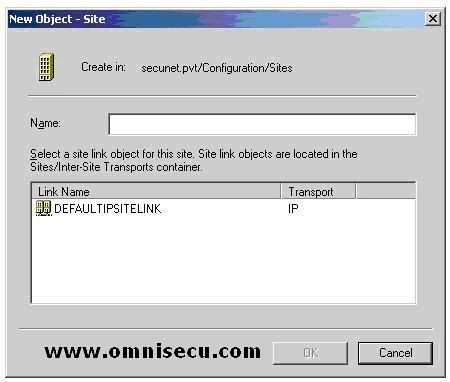
The "New Object-Site" dialog box allows you to enter the name of the new Active Directory site and to select the site link for the new site. Windows Server 2003 creates a default site link called DEFAULTIPSITELINK that can be used to establish the replication process of the Active Directory
service. This default site link uses RPC over TCP/IP, and it will use
any available route to the remote site for replication.
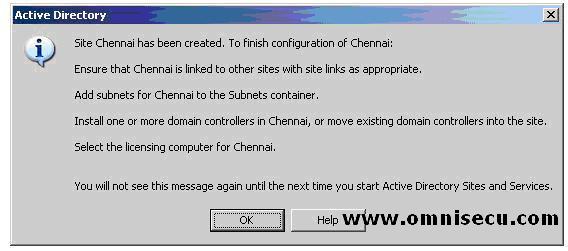
After the new Active Directory site is created, you need to complete some other tasks also and Windows 2003 will show you these tasks in the dialog box.
• Add required IP subnets to the new site.
• Install a new Active Directory Domain Controller, or move an existing Active Directory Domain
Controller to the new site (Although a domain controller is not
mandatory for a site, it is strongly recommended for obvious reasons).
• Connect the site to other existing Active Directory sites within the forest with the appropriate site link.
• Configure a licensing server within the site.
How to move Domain Controllers between Active Directory Sites
A Domain Controller is automatically placed within an Active Directory site during the installation of Active Directory in that server. The Active Directory installation tool "dcpromo.exe" checks for the defined sites during installation of Active Directory,
and if the server's IP address falls within the range of a defined
subset, the server is automatically placed within the site associated
with that subnet.
In some situations, when the automated Active Directory site assignment does not fit your real physical network, you may require to move the Domain Controller to a different Active Directory site.
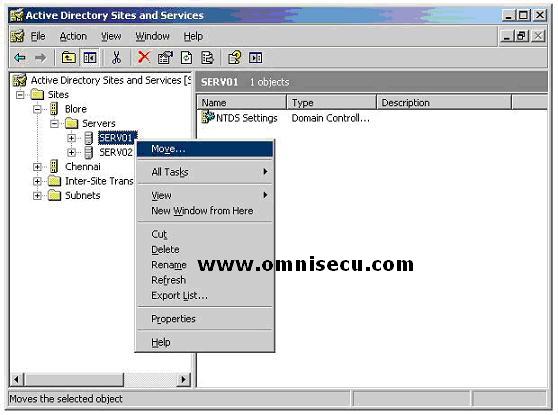
To move a Domain Controller between two Active Directory Sites, you have to use "Active Directory Sites and Services" snap-in (Start > Programs > Administrative Tools > Active Directory
Sites and Services). Navigate to the server you want to relocate (the
server "SERV01", as shown in this case). Right click the server object
and choose "Move" from the popup menu.
Select the new Active Directory site, where you want to move the Domain Controller.
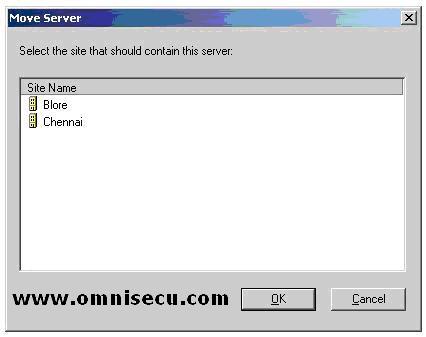
Click "OK", and the Domain Controller will be moved to the new Active Directory site.
How to create and configure subnets for Active Directory Sites
A subnet is a portion of the IP space of a network. Subnets are described by their IP network address combined with a subnet mask measured in bits. Click the following links and the to learn more about IP V4 addresses, and Class C Subnetting Tutorials.
The subnet objects in Active Directory are the logical representation of the subnets in your physical network environment.
Subnet information is used to find Domain Controller in the same site and Active Directory replication to determine the best routes between domain controllers.
Subnets must be defined in Active Directory to ensure accurate and efficient directory replication and resource usage.
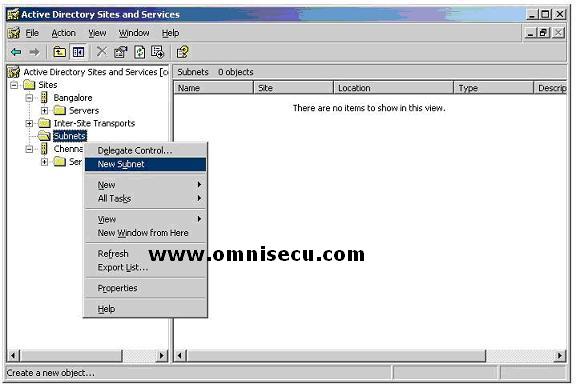
To create a new subnet, right click the subnets folder and select "New Subnet" from the popup menu.
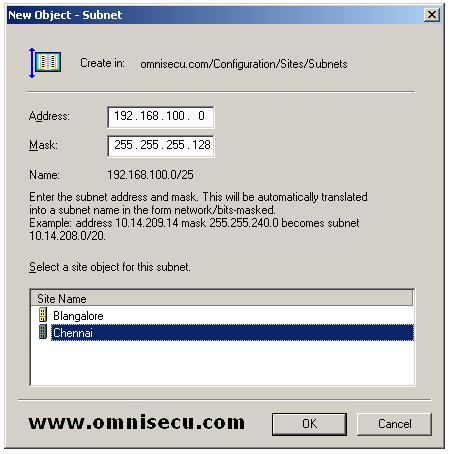
In the New Object - Subnet dialog box
shown below, type the subnet address and the subnet mask that may be
used in this site's subnet. Choose a site to associate this subnet (In
this example, I have selected "Chennai" site), and then click OK. Note
that the CIDR notation of the address is also displayed in the dialog box.
To create another subnet object, again right click the subnets folder and select "New Subnet" from the popup menu.
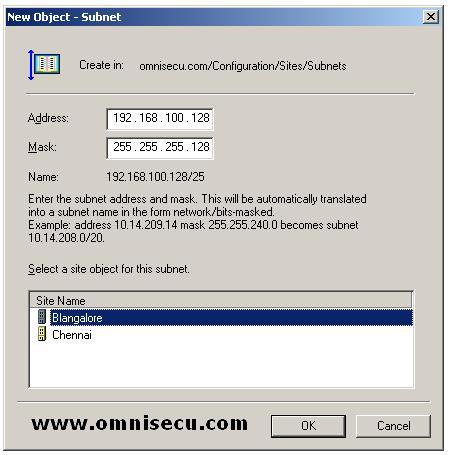
In the New Object - Subnet dialog box
shown below, type the new subnet address and the subnet mask that may
be used in next site's subnet. Choose another site to associate this
subnet (In this example, I have selected "Bangalore" site), and then
click OK.
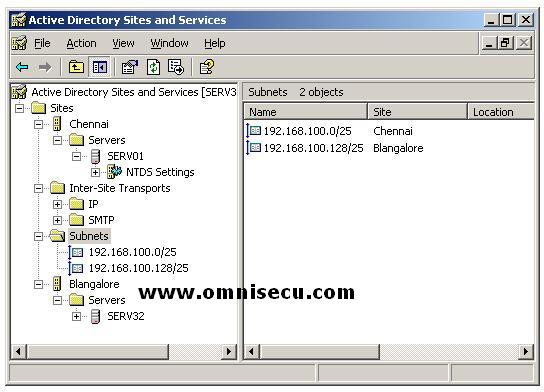
Now you can see the two subnets we have created in this excercise and their associated sites displayed in the "Active Directory Sites and Services snap-in"
What is Active Directory Site link?
An Active Directory site is a physical subnet that is connected using a high-speed connection. Active directory sites are connected using site links, which are low-bandwidth, unreliable connections.
Windows 2003 creates one default site link
“DEFAULTIPSITELINK”, , which can be used for a site-to-site connection
between two sites. “DEFAULTIPSITELINK” can be renamed in the Active Directory Sites and Services snap-in . Administrator can create additional site links using the Active Directory Sites and Services snap-in.
Since site links are used over low-bandwidth WAN links, the primary consideration when configuring site links should be is bandwidth usage. By default, replication is scheduled to occur over the site link 24 hours a day, 7 days a week, at an interval of 180 minutes. If you have limited bandwidth, you should consider altering this.
When multiple
links are configured between sites, priority of each link should be
considered. You should assign priority of link based on availability and
reliability of the connection. The default link cost is 100, and if
many links to a site, the link with the lowest cost is used first.
You can use any of two transport protocols with site links.
Directory Service Remote Procedure Call (DS-RPC)
DS-RPC can be used when there is a live, reliable connection between two or more domain controllers in different sites. IP site links communicate synchronously, meaning each replication transaction must complete before another can start. By default, intersite IP replication adheres to replication schedules and does not require a certificate authority (CA).
Inter-Site Messaging Simple Mail Transport Protocol (ISM-SMTP)
SMTP replication can be used when the network connections are unreliable. SMTP site links communicate asynchronously, which means each replication transaction does not need to complete before another can start. Schedules are not available for SMTP replication and requires CA to sign SMTP messages for the authenticity of directory updates.
Important Notes to remember
• Intrasite replication always uses RPC over IP.
• Intersite replication can use either RPC over IP or SMTP.
• Intersite replication
using SMTP is supported only for domain controllers in different
domains. Domain controllers in the same domain must replicate using RPC
over IP
How to create Active Directory Site Link
To create a new Site Link, follow these steps.
• Open "Active Directory Sites And Services" snap-in (Start > Programs > Administrative Toole > Active Directory Sites And Services).
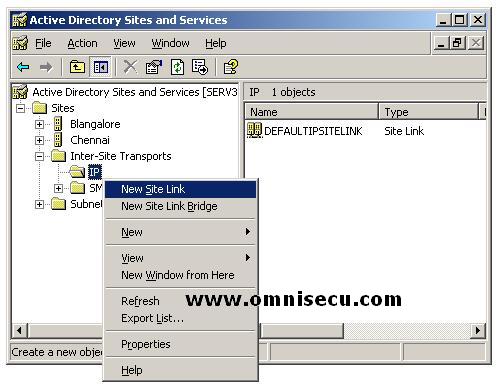
• Open the Inter-Site Transports folder and right-click either the IP or SMTP folder Right Click and select "New Site Link" from the popup menu.
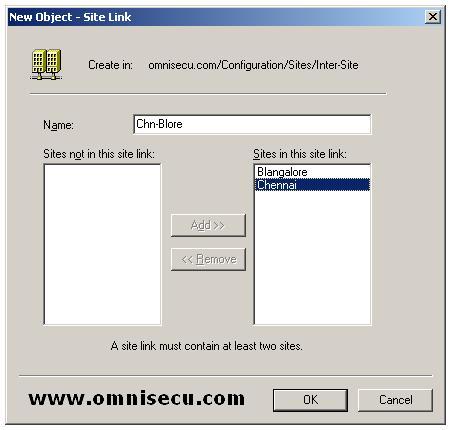
• In the “New Object - Site Link” dialog box, type the name for the site link in the Name field.
• In the “Sites Not in This Site Link” box, click two or more sites to connect, and then click Add. Click OK.
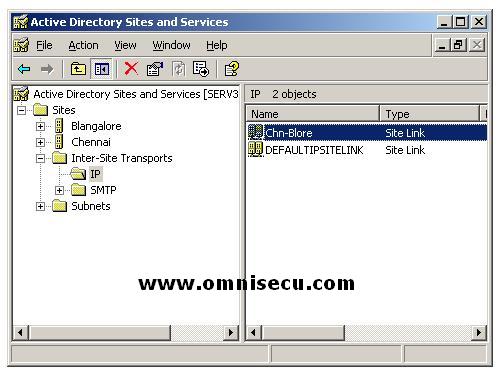
The new Active Directory site link creates is listed in the Active Directory Sites and Services snap-in.
How to configure Site Link attributes
You should configure the site link's properties after you create a site link. Configuring a Site link allows you to specify the link cost, replication schedule, and replication interval. An Active Directory Site Link's property can be configured as explained below.
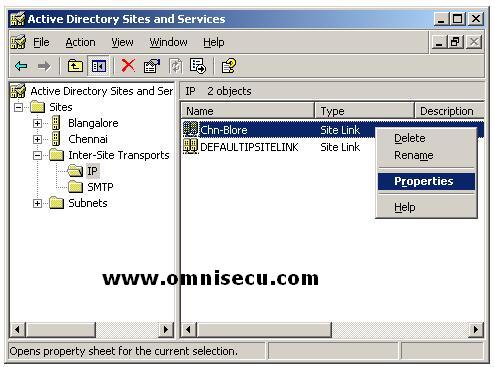
In "Active Directory Sites And Services" snap-in, site links are added to either IP or SMTP folder under Inter-Site Transports. Select the protocol folder (Either IP or SMTP) by clicking the folder, right click the Site Link which you want to configure and select "Properties" from the pop-up menu.
The Properties dialog box of "Chn-Blore" Site Link will be displayed, as shown below.
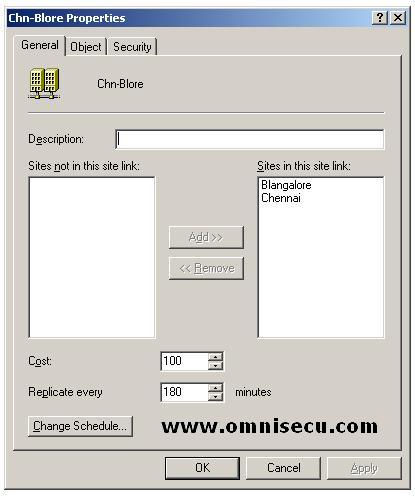
In the above dialog box, you can configure two important properties related to site link, Link Cost and Site Link replication frequency, as explained below.
Configuring Site link Cost
Site Link Cost is a value assigned to the site link
that indicates the cost of the connection in relation to the speed of
the link. Higher costs are used for slow links, and lower costs are used
for fast links. If you have a high speed connection, configure a lower cost value and if you have a low speed connection, configure a high cost value. Active Directory uses a low cost connection is whenever possible.
Configuring Site Link Replication Frequency
Site Link Replication Frequency configuration value is used to instruct Active Directory how many minutes of interval it should check for replication updates. The replication interval minimum value should be atleast 15 and maximum is 10,080 minutes (One week).
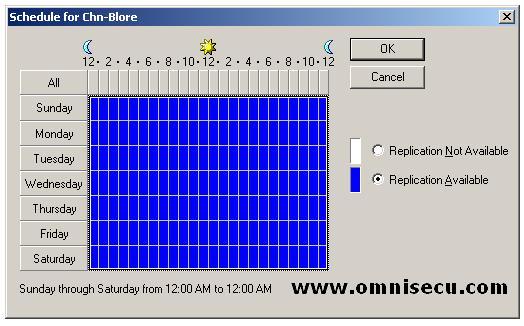
Click the "Change Schedule" button in the Site Link properties dialog shown above to configure the time when this site link is or is not available to replicate directory information. Click "OK" button to complete.
What is bridgehead server , preferred bridgehead server and Knowledge Consistency Checker (KCC)
The replication topology in Active Directory generated automatically by a service known as the Knowledge Consistency Checker (KCC). Knowledge Consistency Checker (KCC) helps to keep same database information across all domain controllers. Knowledge Consistency Checker (KCC) ensures that replication can always take place between Active Directory Domain Controllers.
When two sites are connected by a Site Link, the Knowledge Consistency Checker
(KCC) automatically selects one bridgehead server in each site for each
domain that has Domain Controllers in the site. The data which needed
to be replicated is first sent to the bridgehead server of a site and
then is replicated from bridgehead server to the other domain
controllers inside that site.
A Preferred Bridgehead Server is a Domain Controller
in a site, specified by an administrator, to act as a Bridgehead
Server. More than one preferred Bridgehead Server can be specified, but
only one server is active at a time in a site. A preferred bridgehead server should be a Domain Controller
with high-bandwidth connection to transmit and receive information. If
there is only one preferred bridgehead server is configured in a site
there will not be any replication if that server is not available.
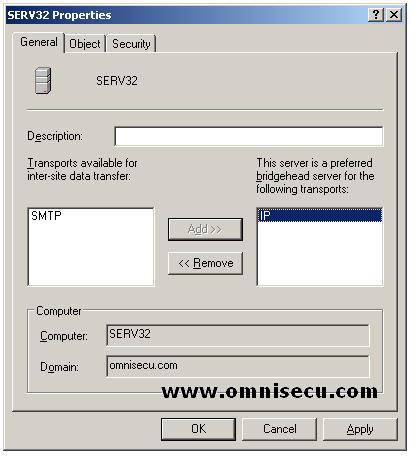
A preferred Bridgehead Server can be designated by the following steps.
• In the “Active Directory Sites And Services” console tree, click the site that contains the Domain Controller which is going to be a preferred bridgehead server. Right click the Domain Controller and select the Properties from the popup menu.
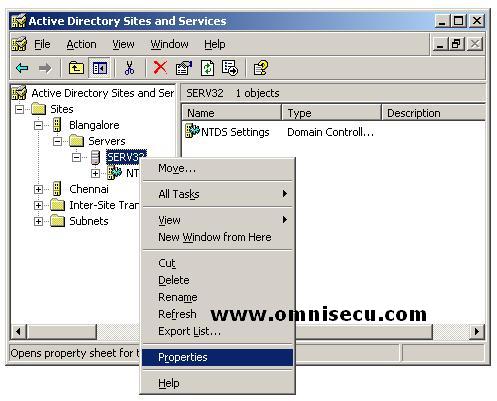
• Select the
intersite transport or transports for which this computer will be a
preferred bridgehead server. Click Add, and then click OK.
What is Site Link Bridge and How to create Site Link Bridge
A site link bridge connects two or more site links. A site link bridge enables transitivity between site links. Each site link in a bridge must have a site in common with another site link in the bridge.
By default, all site links are transitive and it is recommended to keep transitivity enabled by not changing the default value of "Bridge all site links" (enabled by default).
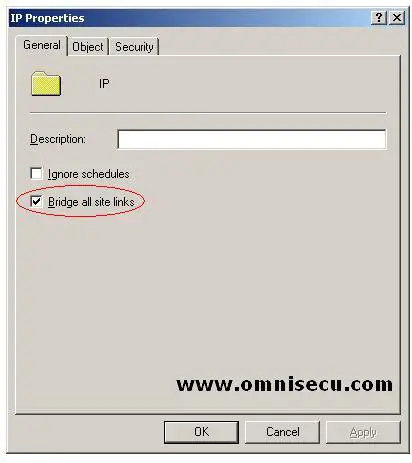
We may need to disable "Bridge all site links" and create a site link bridge design if
• When the IP network is not fully routed.
• When we need to control the replication flow in Active Directory.
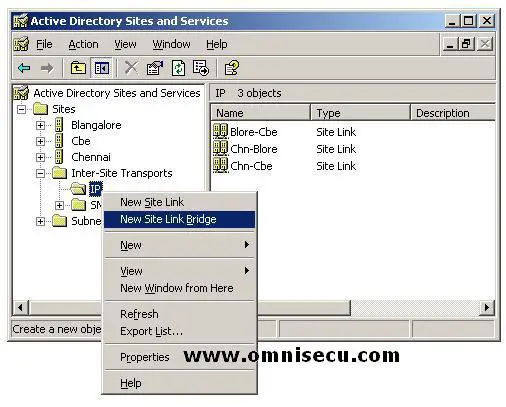
To create a site link bridge, follow these steps
• Open Active Directory Sites And Services.
• Open the "Inter-Site Transports folder" and right-click either the IP or SMTP folder, and then click New Site Link Bridge.
• Open the "Inter-Site Transports folder" and right-click either the IP or SMTP folder, and then click New Site Link Bridge.
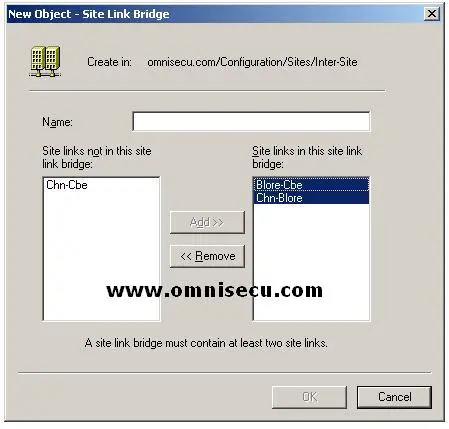
• Type a name for the site link bridge and select the site links to be added to this site link bridge.
What is Active Directory Global Catalog?
The Active Directory Global Catalog
is the central storage of information about objects in an Active
Directory forest. A Global Catalog is created automatically on the first
domain controller in the first domain in the forest. The Domain
Controller which is hosting the Global Catalog is known as a Global Catalog Server. A Global Catalog server stores a full copy of all objects in the directory for its host domain and a partial copy of all objects for all other domains in the forest. Global Catalog helps in searching Active Directory objects in the foreset more efficiently.
The Active
Directory Global Catalog is responsible for several other important
functions of the Active Directory, such as the following:
• Logon validation of universal group membership
• User Principal Name (UPN) logon validation through DC location
• Search capabilities for every object within an entire forest
The function of a
Global Catalog can be compared with a telephone directory. Global
Catalog stores information like a telephone directory that users can
perform queries against to find specific information.
How to configure a Domain Controller as Global Catalog Server
When you create the Active Directory forest, by default the first Domain Controller will serve as the Global Catalog Server, but we can designate any Domain Controller as the Global Catalog Server.
To configure a Domain Controller as Global Catalog Server, follow these steps.
• Open Active Directory Sites and Services (Start > Programs > Administrative Tools > Active Directory Sites and Services).
• Select the Sites branch.
• Select the site that owns the server, and expand the Servers branch.
• Expand the Domain Controller by double clicking on it.
• Right click the “NTDS Settings” and select properties from the popup menu.
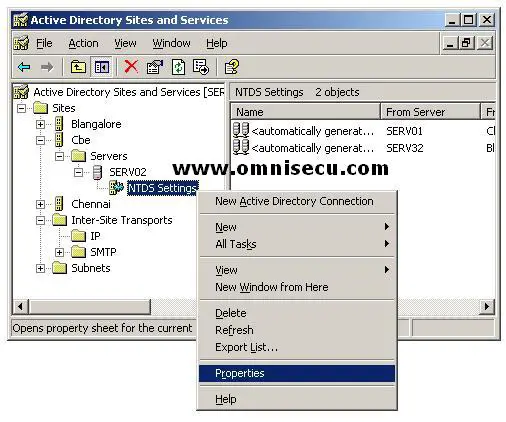
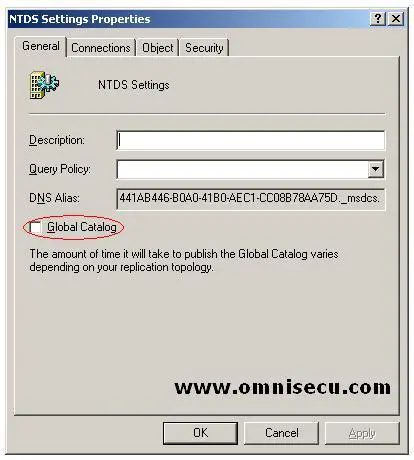
If you want to assign this Domain Controller as the Global Catalog, check the checkbox "Global Catalog" in "NTDS Settings Properties" dialog box.
What is Universal Group Membership caching
If you have sites separated by slow or unreliable WAN links, the practice is to place a GC server at each local site, but this can increase the replication traffic. If the domain is operating at the Windows Server 2003 functional level, we can deploy domain controllers, which can store universal group membership information locally.
Universal Group Membership Caching is most practical for smaller branch offices with low capacity servers, which cannot handle additional load of hosting a GC, or locations that have extremely slow WAN connections.
When a user
attempts to log on for the first time, the Domain Controller obtains the
universal group membership for that user from a Global Catalog. This
information is cached on the Domain Controller for that site
indefinitely and is periodically refreshed in every 8 hours. Up to 500
universal group memberships can be updated at once.
The benefits of Universal Group Membership Caching are
• Faster logon times.
• Hardware upgradation to support Global Catalog is not required
• Low network bandwidth consumption.
How to configure Universal Group Membership caching
To enable Universal Group Membership Caching follow these steps.
• Open Active Directory Sites and Services (dssite.msc).
• Click the site to enable universal group membership caching.
• Right click NTDS Site Settings and then click Properties from the details pane.
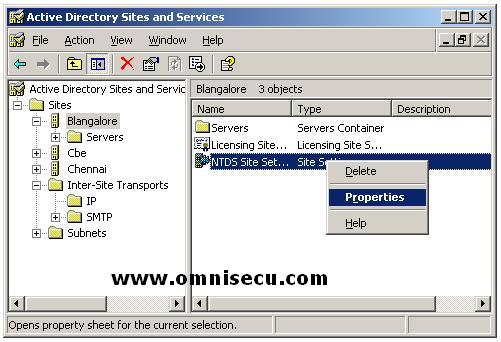
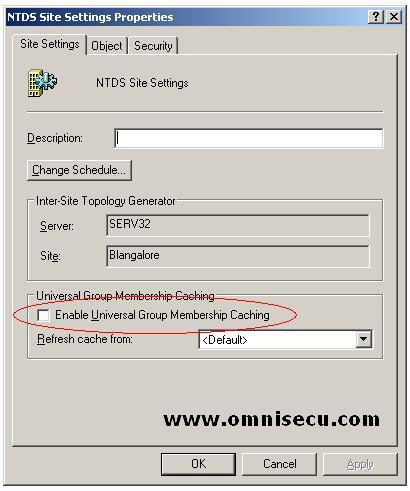
• Select Enable Universal Group Membership Caching check box.
• In Refresh cache from, click a site from which this site will refresh its cache, or accept <Default> to refresh the cache from the nearest site that has a global catalog.

0 comments
Post a Comment