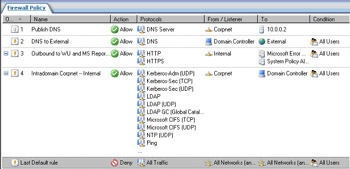
You must create Access Rules allowing new outbound connections from hosts on the network services segment and any other network. In most cases, the only outbound connections you’ll want to allow are those that enable access to the Windows update site or the Windows Server Update Service (WSUS) server on the corporate network.You would also likely want to enable outbound access to public DNS servers if your domain DNS servers are also providing Internet host name resolution.
Exactly what you want to allow as outbound from the servers on the network services segment is going to be very specific to your own implementation. In our current example, we’re going to allow only outbound DNS traffic from the DNS server and outbound Hypertext Transfer Protocol (HTTP) and Hypertext Transfer Protocol Secure (HTTPS) traffic from all hosts on the network services segment to the Windows Update sites.
Creating the Access Rule Allowing DNS Traffic from the DNS Server to the Internet
Perform the following steps to create the Access Rule:
-
At the back-end ISA firewall, in the ISA firewall console, expand the name of the server and then click the Firewall Policy node in the left pane of the console.
-
Click the Create New Access Rule link on the Tasks tab in the Task pane.
-
In the Welcome to the New Access Rule dialog box, enter a name for the rule in the Access Rule name text box. In this example, we’ll name the rule DNS to External. Click Next.
-
On the Rule Action page, select the Allow option and click Next.
-
On the Protocols page, select the Selected protocols option from the This rule applies to list. Click Add.
-
Click the Common Protocols folder and then double click the DNS entry. Click Close.
-
Click Next on the Protocols page.
-
On the Access Rule Sources page, click the Add button.
-
In the Add Network Entities dialog box, click the Computers folder and double click the Domain Controller entry. Click Close.
-
Click Next on the Access Rule Sources page.
-
On the Access Rule Destinations page, click the Add button.
-
In the Add Network Entities dialog box, click the Networks folder. Double click the External network. Click Close.
-
Click Next on the Access Rule Destinations page.
-
On the User Sets page, accept the default entry, All Users, and click Next.
-
Click Finish on the Completing the New Access Rule Wizard page.
Creating the Access Rule Allowing Outbound Windows Update and Microsoft Reporting
Perform the following steps to create the HTTP/HTTPS Access Rule allowing access to the Windows Update and Reporting sites:
-
At the back-end ISA firewall, in the ISA firewall console, expand the name of the server and then click the Firewall Policy node in the left pane of the console.
-
Click the Create New Access Rule link on the Tasks tab in the Task pane.
-
In the Welcome to the New Access Rule dialog box, enter a name for the rule in the Access Rule name text box. In this example, we’ll name the rule Outbound to WU and MS Reporting. Click Next.
-
On the Rule Action page, select the Allow option and click Next.
-
On the Protocols page, select the Selected protocols option from the This rule applies to list. Click Add.
-
Click the Common Protocols folder and then double click the HTTP and HTTPS entries. Click Close.
-
Click Next on the Protocols page.
-
On the Access Rule Sources page, click the Add button.
-
In the Add Network Entities dialog box, click the Networks folder and double click the Internal entry. Click Close.
-
Click Next on the Access Rule Sources page.
-
On the Access Rule Destinations page, click the Add button.
-
In the Add Network Entities dialog box, click the Domain Name Sets folder. Double click the Microsoft Error Reporting sites and System Policy Allowed Sites entries. Click Close.
-
Click Next on the Access Rule Destinations page.
-
On the User Sets page, accept the default entry, All Users, and click Next.
-
Click Finish on the Completing the New Access Rule Wizard page.
-
Click Apply to save the changes and update the firewall policy.
-
Click OK in the Apply New Configuration dialog box.
Your firewall policy should look like Figure 10.19.


0 comments
Post a Comment