
Now we’re ready to create Publishing Rules and Access Rules that allow hosts on the Corpnet ISA firewall network and external clients on the Internet to access Exchange server and file server resources on the network services segment. Hosts on the Corpnet ISA firewall network will be able to connect to Exchange server and file server resources by going through the network services segment perimeter ISA firewall. Hosts on the Internet will need to traverse both the edge ISA firewall and the network services segment perimeter ISA firewall. Later we will create the rules on the edge ISA firewall to enable access to network services perimeter resources.
In this section, we will do the following:
-
Create an OWA Web Publishing Rule on the network services perimeter ISA firewall.
-
Create SMTP, POP3, and IMAP4 Server Publishing Rules.
-
Create an Access Rule allowing access to file shares on the file server.
In our scenario on creating network services segments using ISA firewalls, I will assume that you have already deployed your certificate infrastructure and have already requested the appropriate Web site certificates to support Secure Sockets Layer/Transaction Layer Security (SSL/TLS) connections to the Exchange server’s e-mail services.
If you haven’t done this and are not sure how to start, I highly recommend the ISA Server 2004/Exchange Server deployment kit documents I created for Microsoft at http://download.microsoft.com/download/1/8/8/188ab94a-4ec5-4746-ac0fa18177040fbf/isa2004se_exchangekit-rev%201%2005.doc (note that this is a very large document; if you need an individual Word file that applies to your network configuration from one of the chapters in the deployment kit doc, write to me at tshinder@isaserver.org and I’ll send you the separate doc).
In the scenario used in this chapter, we’ve bound certificates to the OWA Web site, the SMTP site, the POP3 site, and the IMAP4 site on the Exchange server on the network services segment.Table 10.3 shows the common/subject names on the certificates bound to each site.
| Exchange Server Service | Common/Subject Name on Web Site Certificate |
|---|---|
| OWA | owa.msfirewall.org |
| SMTP | mail.msfirewall.org |
| POP3 | pop3.msfirewall.org |
| IMAP4 | imap4.msfirewall.org |
In the following sections, we will create Access Rules, Web Publishing Rules, and Server Publishing Rules with the characteristics listed in Table 10.4.
| Order | Name | Action | Protocols | From/Listener | To | Condition |
|---|---|---|---|---|---|---|
| 1 | Exchange Server IMAPS Server | Allow Allow | IMAPS Server POP3S | Corpnet Corpnet | 10.0.0.2 10.0.0.2 | N/A N/A |
| 2 | Exchange Server POP3S Server | Server | ||||
| 3 | Exchange Server SMTP Server | Allow | SMTP Server | Corpnet | 10.0.0.2 | N/A |
| 4 | Exchange Server IMAP4 Server | Allow | IMAP4 Server | Corpnet | 10.0.0.2 | N/A |
| 5 | Server POP3 | POP3 Server | 10.0.0.2 | N/A | ||
| 6 | Exchange Server SMTPS Server | Allow | SMTPS Server | Corpnet | 10.0.0.2 | N/A |
| 7 | Publish OWA | Allow | HTTPS | OWA Listener | owa.ms firewall.org | All Users |
| 8 | Publish DNSAllow | DNS Server | Corpnet | 10.0.0.2 | ||
| 9 | DNS to External | Allow | DNS | Domain Controller | External | All Users |
| 10 | Outbound WU and MS Reporting | Allow | HTTP HTTPS | Internal | Microsoft Error Reporting Sites System Allowed Sites | All Users |
| 11 | Intradomain Internal | Kerberos- Adm (UDP) Kerberos- Sec (TCP) Kerberos- Sec (UDP) LDAP LDAP (UDP) LDAP GC (Global Catalog) Microsoft CIFS (TCP) Microsoft CIFS (UDP) NTP (UDP) Ping RPC (all interfaces) | Corpnet | Domain Controller | All Users | |
| 12 | File Server Access | Allow | Microsoft CIFS (TCP) Microsoft CIFS (UDP) | Corpnet | File Server 1 | All Users |
To simplify the configuration, we’ll leverage the ISA firewall’s Mail Server Publishing Wizard to create multiple Publishing Rules simultaneously.
Creating an OWA Publishing Rule on the Network Services Perimeter ISA Firewall
Perform the following steps on the network services perimeter ISA firewall to create the Web Publishing Rule that publishes the OWA Web site:
2. On the Firewall Policy node, click the Tasks tab in the Task pane and then click the Publish a Mail Server link.
-
On the Welcome to the New Mail Server Publishing Rule Wizard page, enter a name for the rule in the Mail Server Publishing Rule name text box. In this example, we’ll name the rule Publish OWA. Click Next.
-
On the Select Access Type page, select the Web client access: Outlook Web Access (OWA), Outlook Mobile Access, Exchange Server ActiveSync option and click Next.
-
On the Select Services page, select the Outlook Web Access checkbox and click Next (see Figure 10.20).
-
On the Bridging Mode page, select the Secure connection to clients and mail server option.This enables SSL-to-SSL bridging. Click Next (see Figure 10.21).
-
On the Specify the Web Mail Server page, enter the name on the Web site certificate bound to the OWA Web site. In this example, the name is owa.msfirewall.org. Keep in mind that the ISA firewall will need to resolve this name to the actual IP address of the OWA site on the network services segment.You can do this with a HOSTS file entry on the ISA firewall, or set up a split DNS infrastructure.
The split DNS infrastructure might be challenging in this scenario, because as you’ll see later, we would need to create a triple split DNS to support name resolution for the ISA firewall itself, for hosts on the corporate network, and for hosts located on the Internet. Although putting together a well-designed split DNS infrastructure is fairly simple, some network admins have misconceptions that it’s either insecure or difficult to manage. Both misconceptions are patently incorrect and you should not fall prey to them. We will create the HOSTS file entry on the network services perimeter ISA firewall after we’ve created all the Publishing and Access Rules. Click Next (see Figure 10.22).
-
On the Public Name Details page, select the This domain name (type below) in the Accept requests for list. Enter the common/subject name on the Web site certificate that will be bound to the Web listener for this Web Publishing Rule. In this example, we have exported the Web site certificate bound to the OWA Web site and imported it into the machine certificate stored on the ISA firewall. Because this is the same certificate, it has the same common/subject name. Therefore, we enter owa.msfirewall.org in the Public name text box. Click Next (see Figure 10.23).
-
On the Select Web Listener page, click the New button.
-
On the Welcome to the New Web Listener Wizard page, enter a name for the listener in the Web listener name text box. In this example, we’ll name the Web listener OWA Listener. Click Next.
-
On the IP Addresses page, put a checkmark in the Corpnet checkbox and click Next.
-
On the Port Specification page, remove the checkmark from the Enable HTTP checkbox and put a checkmark in the Enable SSL checkbox. Click the Select button.
-
Select the OWA Web site certificate from the list in the Select Certificate dialog box and click OK (see Figure 10.24).
-
Click Next on the Port Specification page.
-
Click Finish on the Completing the New Web Listener page.
-
On the Select Web Listener page, click the Edit button.
-
On the OWA Listener Properties dialog box, click the Preferences tab.
-
On the Preferences tab, click the Authentication button.
-
In the Authentication dialog box, remove the checkmark from the Integrated checkbox. Click OK in the dialog box informing you that you don’t have any authentication methods configured. Put a checkmark in the OWA Forms-based checkbox. Put a checkmark in the Require all users to authenticate checkbox. Click OK (see Figure 10.25).

Figure 10.25: Specifying Authentication Methods and Settings


-
Click OK in the OWA Listener Properties dialog box.
-
Click Next on the Select Web Listener page (see Figure 10.26).
-
On the User Sets page, click the All Users entry and click Remove. Click the Add button.
-
In the Add Users dialog box, double click the All Authenticated Users entry and click Close.
-
Click Next on the User Sets page.
-
Click Finish on the Completing the New Mail Server Publishing Rule Wizard page.


Your firewall policy should like that in Figure 10.27.

Creating SMTP, POP3, and IMAP4 Server Publishing Rules
The next step is to create the Server Publishing Rules that publish the rest of the Exchange server services.These include Server Publishing Rules for Secure Exchange RPC, SMTP, POP3, and IMAP4. We have the option to create these rules separately or all at once by using the Mail Server Publishing Wizard. We’ll use the latter option to simplify things.
You might notice that we’re not going to create a secure Exchange RPC Server Publishing Rule in this example, for the following reasons:
-
We’re using a Route relationship between the Corpnet ISA firewall network and the network services segment.
-
The intradomain communications Access Rule is configured to allow inbound TCP 135 communications (the RPC [all interfaces] protocol definition).
Because we are using a Route relationship rather than a NAT relationship between the source and destination networks, we can’t bind a specific IP address to the listener used in the Server Publishing Rule. When you use a Route relationship, the Server Publishing Rule listens on all addresses bound to the external interface using a feature known internally as port stealing. Because both the Secure Exchange RPC Server Publishing Rule and the RPC (all interfaces) component of the intradomain communications Access Rule are listening for similar communications, we end up with a conflict that prevents Outlook MAPI clients from connecting to Directory Services.
If there were a NAT relationship between the Corpnet network and the network services segment, we could bind multiple IP addresses to the external interface of the network services perimeter ISA firewall.Then we could create two rules—one for Secure Exchange RPC publishing and the other for RPC (all interfaces)—and use a different listening address for each rule. Machines on the Corpnet ISA firewall network would then connect to Secure Exchange RPC services or RPC (all interfaces) services using the IP address used for their respective rule’s listener.This works because connections are made to the IP addresses on the ISA firewall’s external interface when you have a NAT relationship between the network services segment and the Corpnet ISA firewall network.
It doesn’t work when there is a Route relationship between the network services segment and the Corpnet ISA firewall network because hosts on the Corpnet ISA firewall network connect to the Exchange server using the actual IP address of the Exchange server. Because the hosts are connecting to the IP address of the Exchange server itself and not an IP address on the external interface of the ISA firewall, the ISA firewall’s port stealing mechanism must listen and intercept RPC communications on all IP addresses of the external interface.This breaks the granularity required to allow both a Secure Exchange RPC Server Publishing Rule and an RPC (all interfaces) Access Rule on the same ISA firewall when there is a Route relationship between the source and destination ISA firewall networks.
You can confirm this by creating a secure Exchange RPC Server Publishing Rule in the scenario used in this chapter.Then attempt to make a connection to the Exchange server from the full Outlook MAPI client using RPC (don’t use RPC/HTTP, because the inbound connection is HTTP, so the ISA firewall doesn’t see the RPC communications tunneled in the HTTP header).You’ll see that the connection seems to establish successfully, but if you open the Connection Status window in Outlook 2003, you’ll find that the RPC connections are successful only to the Exchange server’s Mail Services. No connection is established to Directory Services.
Creating Server Publishing Rules for POP3, IMAP4, and SMTP
Perform the following steps to create the Server Publishing Rules on the network services perimeter ISA firewall:
-
In the ISA firewall console, expand the server name and then click the Firewall Policy node.
-
On the Firewall Policy node, click the Tasks tab on the Task pane and click the Publish a Mail Server link.
-
On the Welcome to the New Mail Server Publishing Rule Wizard page, enter a name for the rule in the Mail Server Publishing Rule name text box. In this example, we’ll name the rule Exchange Server. Click Next.
-
On the Select Access Type page, select the Client access: RPC, IMAP, POP3, SMTP option and click Next (see Figure 10.28).
-
On the Select Services page, put a checkmark in each checkbox.This will allow us to connect to the Exchange server on the network services segment through the network services perimeter ISA firewall for all the services listed on this page (with the exception of the Exchange server’s Network News Transfer Protocol [NNTP] service; we could create a separate rule for that if required). Note the comment on the page regarding the SMTP Message Screener. We will not deploy the message screener in this example, but you might want to consider it in your own deployment.You can install the SMTP Message Screener on the ISA firewall to filter both inbound and outbound mail. Even though the SMTP Message Screener won’t be enabled, the SMTP filter is enabled and will protect SMTP communications moving through the network services perimeter ISA firewall. Click Next (see Figure 10.29).
-
On the Select Server page, enter the IP address of the Exchange server in the Server IP address text box. In this example, the Exchange server’s IP address is 10.0.0.2, so we enter that value. Click Next.
-
On the IP Addresses page, put a checkmark in the Corpnet checkbox. Click Next.
-
Click Finish on the Completing the New Mail Server Publishing Rule Wizard page.


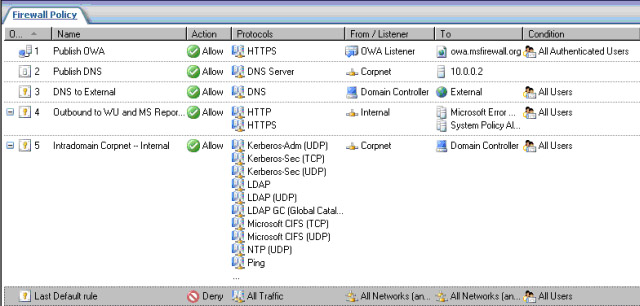
Your firewall policy should appear similar to that in Figure 10.30. Note that the Mail Server Publishing Rule Wizard added seven new Server Publishing Rules. Click Apply to save the changes and update the firewall policy. Click OK in the Apply New Configuration dialog box.


Creating an Access Rule Allowing Access to File Shares on the File Server
Now we can create the Access Rule allowing connections to file shares on the file server on the network services segment. We can enable either NetBIOS protocols or Direct Hosting (TCP 445). In this example, we’ll enable only Direct Hosting, which is more efficient than NetBIOS protocols.
Perform the following steps to create the Direct Hosting Access Rule on the network services perimeter firewall:
-
In the ISA firewall console, expand the server name and then click the Firewall Policy node.
-
On the Firewall Policy node, click the Tasks tab in the Task pane and then click Create New Access Rule.
-
On the Welcome to the New Access Rule Wizard page, enter a name for the rule in the Access Rule name text box. In this example, we’ll name the rule Publish File Server. Click Next.
-
Select the Allow option on the Rule Action page and click Next.
-
On the Protocols page, select the Selected protocols option from the This rule applies to list and then click Add.
-
In the Add Protocols dialog box, click the All Protocols folder and then double click the Microsoft CIFS (TCP) and Microsoft CIFS (UDP) protocols. Click Close (see Figure 10.31).
-
Click Next on the Protocols page.
-
Click Add on the Access Rule Sources page.
-
In the Add Network Entities dialog box, click the Networks folder and then double click the Corpnet entry. Click Close (see Figure 10.32).
-
Click Next on the Access Rule Sources page.
-
Click Add on the Access Rule Destinations page.
-
In the Add Network Entities dialog box, click the New menu and then click Computer.
-
In the New Computer Rule Element dialog box, enter a name for the file server in the Name text box. In this example, we’ll name it File Server 1. Enter the IP address of the file server located in the network services segment in the Computer IP Address text box. Enter an optional description if you like. Click OK (see Figure 10.33).
-
Click the Computers folder in the Add Network Entities dialog box, double click the File Server 1 entry, and click Close.
-
Click Next on the Access Rule Destinations page.


17. Click Finish on the Completing the New Access Rule Wizard page.
Your firewall policy should look like that in Figure 10.34.


0 comments
Post a Comment