Clients on the Corpnet ISA firewall network need to know the route to the network services segment. As discussed earlier in this chapter, you have two options: Use LAN routers that contain the appropriate routing table entries to reach the network services segment, or configure the clients with a routing table entry.
In this chapter, we’ll create routing table entries on the clients.You can automate this process by using a logon script that contains the Route add command used to add the routing table entry.The command required is:
Route add –p 10.0.0.0 MASK 255.255.255.0 10.0.1.2 In the preceding command, –p makes the routing table entry permanent, 10.0.0.0 is the network ID of the network services segment, 255.255.255.0 is the subnet mask for the network services segment, and 10.0.1.2 is the gateway address used to reach that network.
All the pieces are now in place to add the network clients to the domain.The network services perimeter ISA firewall has the appropriate Access Rules in place to join hosts on the Corpnet ISA firewall network to the domain.The procedure varies with the operating system you’re joining to the domain. In this chapter, we’re joining a Windows XP client to the domain.
Creating and Configuring DNS Entries in the Domain DNS, Including WPAD Entries
DNS infrastructure design is critical for all Windows environments. One of the most common reasons for connectivity and performance issues is a poorly designed DNS infrastructure. Proper DNS infrastructure is critically important in ISA firewall networking because the ISA firewall uses DNS name resolution for access control and security monitoring.
Clients on the Corpnet ISA firewall network will be configured as both Web proxy and Firewall clients. Web proxy and Firewall clients need to be able to locate the edge ISA fire-wall to access the Internet. Although you can manually configure each host with the proper information, it’s much easier to automate the process using Web Proxy Auto Discovery (WPAD) entries in DNS and/or DHCP.
Web proxy and Firewall clients use WPAD entries in DNS and/or DHCP to find the address of the ISA firewall. After the clients find the address of the ISA firewall, the clients obtain configuration information from the ISA firewall. By default, the ISA firewall advertises configuration information on TCP port 80, which can be changed if required. However, if you use DNS-based WPAD entries, you must use TCP port 80. If you use DHCP for WPAD information, you can use any port you like to advertise autodiscovery information.
In this chapter, we will use DNS WPAD publishing. We will create a WPAD CNAME record based on the Host (A) record for the edge ISA firewall.The Host (A) record for the edge ISA firewall maps the name of the edge ISA firewall to the IP address on the internal interface of the edge ISA firewall.
Perform the following steps to create the WPAD entry on the domain DNS server on the network services segment:
-
At the DNS server, click Start, point to Administrative Tools, and click DNS.
-
In the DNS console, expand the server name and then expand the Forward Lookup Zones node. Click on the domain, which in this case is msfirewall.org.
-
Right click the domain name and click New Alias (CNAME).
-
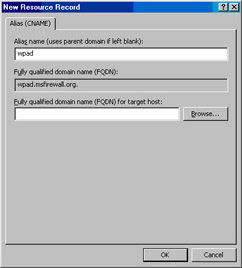
In the New Resource Record dialog box, enter wpad in the Alias name (uses parent domain if left blank) text box. Click the Browse button (see Figure 10.53).
-
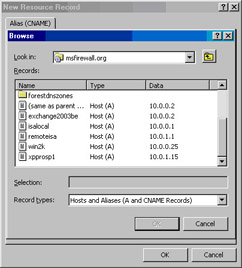
Double click the server name in the Records section, and then double click the Forward Lookup Zone entry. Double click the domain name and then double click the entry for the edge ISA firewall. In this example, the name of the edge ISA firewall is remoteisa, so double click that one (see Figure 10.54).
-
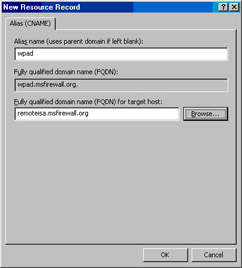
Click OK in the New Resource Record dialog box (see Figure 10.55).
-
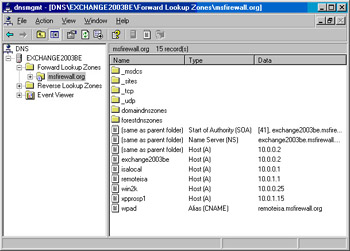
The new CNAME record appears in the right pane of the console, as shown in Figure 10.56.
Note that the edge ISA firewall’s IP address is included in the domain DNS because it was automatically added when the firewall joined the domain. If your domain DNS is not configured to enable automatic registration of DNS records, you’ll need to create the Host (A) record yourself before you can create the CNAME record.


0 comments
Post a Comment