Firewall policy on the edge ISA firewall will be highly customized based on your network’s security requirements.You will need to decide together with your network security team who should have access to what Web sites and at what times of the day. Firewall policy is definitely something where one size does not fit all.
In the example provided by our sample network configuration, all hosts on the Corpnet ISA firewall network are configured as Firewall and Web proxy clients and are not configured as SecureNAT clients.The only exception is for administrator workstations, because network administrators will need access to non-Winsock protocols and utilities, such as PING and TRACERT.
We will create the following Access Rules:
-
An Access Rule allowing the domain controller on the network services segment access to DNS outbound.
-
An Access Rule allowing all authenticated users outbound access to all protocols.
Note that in a production environment, you would create more granular access controls and create ISA firewall groups that allow users to access only the content they require to get their jobs done.
-
An Access Rule allowing the servers on the network services segment access to the Windows reporting and Microsoft Update sites. We need this rule because the servers on the network services segment do not have logged-on users, so we will not be able to leverage the Firewall client to force authentication from server connections.
Table 10.5 shows the salient characteristics of these Access Rules.
Creating the Outbound DNS for the DNS Server Access Rule
Perform the following steps to create the Access Rule allowing the domain controller on the network services segment outbound access to the DNS protocol:
-
On the edge ISA firewall, open the ISA firewall console and click the Firewall Policy node.
-
On the Firewall Policy node, click the Tasks tab on the Task pane and click Create New Access Rule.
-
On the Welcome to the New Access Rule Wizard page, enter a name for the rule in the Access Rule name text box. In this example, we’ll name the rule Outbound DNS for DNS Server. Click Next.
-
Select the Allow option on the Rule Action page. Click Next.
-
On the Protocols page, select the Selected protocols option from the This rule applies to list and click Add.
-
In the Add Protocols dialog box, click the Common Protocols folder and double click on the DNS entry. Click Close.
-
Click Next on the Protocols page.
-
On the Access Rule Sources page, click the Add button.
-
In the Add Network Entities dialog box, click the New menu and click Computer.
-
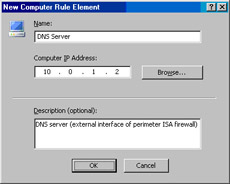
In the New Computer Rule Element dialog box, enter a name for the computer in the Name text box. In this example, we’ll name the computer DNS Server. Enter the IP address of the external interface of the network services segment perimeter ISA firewall. Note that we use the IP address of the external interface of the perimeter ISA firewall because there is a NAT relationship between the perimeter ISA firewall’s default internal network and its default external network. Because the DNS queries the DNS server makes are to the Internet-based DNS server, the connection will be NATed. When the connection is NATed, the source IP address of the outbound connection is the primary IP address on the external interface of the perimeter ISA firewall. In this example, the IP address is 10.0.1.2, so we’ll enter that address. Enter an optional description if you like. Click OK (see Figure 10.38).
-
In the Add Network Entities dialog box, click the Computers folder and double click the DNS Server entry. Click Close (see Figure 10.39).
-
Click Next on the Access Rule Sources page.
-
Click Add on the Access Rule Destinations page.
-
In the Add Network Entities dialog box, click the Networks folder and then double click External. Click Close.
-
Click Next on the Access Rule Destinations page.
-
Click Next on the User Sets page.
-
Click Finish on the Completing the New Access Rule Wizard page.
Creating the All Open Rule for Authenticated Users
Perform the following steps to create the outbound Access Rule allowing all authenticated users outbound access to all protocols and sites:
-
On the edge ISA firewall, open the ISA firewall console and click the Firewall Policy node.
-
On the Firewall Policy node, click the Tasks tab on the Task pane and click Create New Access Rule.
-
On the Welcome to the New Access Rule Wizard page, enter a name for the rule in the Access Rule name text box. In this example, we’ll name the rule All Open—Authenticated. Click Next.
-
Select the Allow option on the Rule Action page. Click Next.
-
On the Protocols page, select the All outbound traffic option from the This rule applies to list and click Next.
-
Click Next on the Protocols page.
-
On the Access Rule Sources page, click the Add button.
-
In the Add Network Entities dialog box, click the Networks folder and then double click Internal. Click Close.
-
Click Next on the Access Rule Sources page.
-
Click Add on the Access Rule Destinations page.
-
In the Add Network Entities dialog box, click the Networks folder and then double click External. Click Close.
-
Click Next on the Access Rule Destinations page.
-
On the User Sets page, click the All Users entry and click Remove. Click Add.
-
In the Add Users dialog box, double click on the All Authenticated Users entry and click Close (see Figure 10.40).
-
Click Next on the User Sets page.
-
Click Finish on the Completing the New Access Rule Wizard page.
Creating the Microsoft Update and Error Reporting Sites Access Rule
Perform the following steps to create the Access Rule allowing servers on the network services segment access to the Windows Update sites and the Microsoft Error Reporting sites:
-
On the edge ISA firewall, open the ISA firewall console and click the Firewall Policy node.
-
On the Firewall Policy node, click the Tasks tab on the Task pane and click Create New Access Rule.
-
On the Welcome to the New Access Rule Wizard page, enter a name for the rule in the Access Rule name text box. In this example, we’ll name the rule MU and Error Reporting—Servers. Click Next.
-
Select the Allow option on the Rule Action page. Click Next.
-
On the Protocols page, select the Selected protocols option from the This rule applies to list and click Add.
-
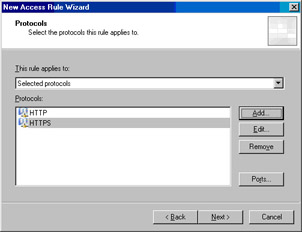
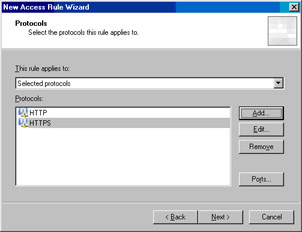
In the Add Protocols dialog box, click the Common Protocols folder and double click on the HTTP and HTTPS entries. Click Close.
-
Click Next on the Protocols page (see Figure 10.41).

Figure 10.41: Selecting the Protocols to Which the Rule Applies -
On the Access Rule Sources page, click the Add button.
-
In the Add Network Entities dialog box, click the New menu and click Address Range.
-
In the New Address Range Rule Element dialog box, enter a name for the address range in the Name text box. In this example, we’ll name it Network Services Segment. Enter the start and end addresses in the Start Address and End Address text boxes. Enter an optional description and then click OK (see Figure 10.42).
-
In the Add Network Entities dialog box, click the Address Ranges folder and double click the Network Services Segment entry. Click Close (see Figure 10.43).
-
Click Next on the Access Rule Sources page.
-
Click Add on the Access Rule Destinations page.
-
In the Add Network Entities dialog box, click the Domain Name Sets folder and double click Microsoft Error Reporting sites and System Policy Allowed Sites. Click Close (see Figure 10.44).
-
Click Next on the Access Rule Destinations page.
-
Click Next on the User Sets page.
-
Click Finish on the Completing the New Access Rule Wizard page.
Before applying the configuration to the ISA firewall’s firewall policy, make sure that you put the unauthenticated Access Rules before the authenticated rules.This is a good general approach to ordering firewall rules on your ISA firewall.
Click Apply to save the changes and update the firewall policy. Click OK in the Apply New Configuration dialog box.Your firewall policy should look like that in Figure 10.45.
Creating Publishing Rules on the Edge ISA Firewall to Allow Inbound Connections to the Exchange Server Mail Services
Now we’re ready to create Publishing Rules allowing access to Exchange server services for users on the Internet. We’ll create Server Publishing Rules that allow access to the OWA, Secure Exchange RPC, SMTP, POP3, and IMAP4 services.
Creating an SSL Server Publishing Rule on the Network Services Perimeter ISA Firewall
We begin by creating an SSL Server Publishing Rule on the front-end ISA firewall. We must create a Server Publishing Rule rather than a Web Publishing Rule because the OWA form generated by the network services perimeter ISA firewall cannot be delivered through a Web proxy connection on the edge ISA firewall.The SSL Server Publishing Rule will enable a secure, end-to-end connection but will not allow the edge ISA firewall to perform stateful application layer inspection on the SSL connection moving through the edge ISA firewall. The edge ISA firewall will be limited, like a typical “hardware” firewall, to simple stateful packet inspection.
This is a limitation of our sample network design and should not be construed to imply that you can never use OWA FBA in a back-to-back ISA firewall configuration. For example, suppose you have a back-to-back ISA firewall configuration with a DMZ between the front-end and back-end ISA firewalls.You can use FBA on the front-end ISA firewall and configure its OWA Web Publishing Rule to forward basic credentials to the back-end ISA firewall’s Web Publishing Rule.The back-end ISA firewall is configured to use basic authentication. In this case, we have single sign-on with FBA.
Creating the Network Services Perimeter Network OWA Web Publishing Rule
Perform the following steps on the edge ISA firewall to enable inbound access to the network services perimeter ISA firewall’s OWA Web Publishing Rule:
-
In the ISA firewall console, expand the server name and click the Firewall Policy node.
-
On the Firewall Policy node, click the Tasks tab on the Task pane and then click the Publish a Secure Web Server link.
-
On the Welcome to the SSL Web Publishing Rule Wizard page, enter a name for the rule in the SSL Web Publishing Rule name text box. In this example, we’ll name the rule SSL tunnel to OWA. Click Next.
-
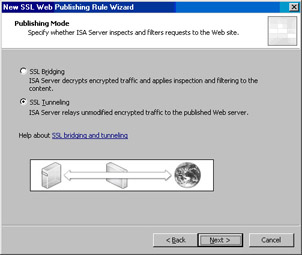
On the Publishing Mode page, select the SSL Tunneling option and click Next (see Figure 10.46).
-
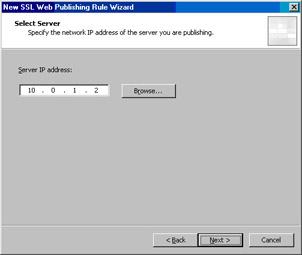
On the Select Server page, enter the IP address of the external interface of the network services perimeter ISA firewall.This is the address used by the listener on the OWA Web Publishing Rule on the network services perimeter ISA firewall. In this example, the IP address is 10.0.1.2, so we’ll enter that address and click Next (see Figure 10.47).

Figure 10.47: Entering the IP Address of the External Interface of the Network Services Perimeter ISA Firewall -
On the IP Addresses page, put a checkmark in the External checkbox and click Next.
-
Click Finish on the Completing the New SSL Web Publishing Rule Wizard page.
At this point, your firewall policy should look like that in Figure 10.48.
Creating Secure Exchange RPC, SMTP, POP3, and IMAP4 Server Publishing Rules
The next step is to create the Server Publishing Rules on the edge ISA firewall that provide access to the Server Publishing Rules configured on the network services perimeter ISA firewall.These Server Publishing Rules enable Internet-based hosts access to the Exchange server services on the network services segment.
Creating the Mail Server Publishing Rules
Perform the following steps to create the Server Publishing Rules on the edge ISA firewall:
-
In the ISA firewall console, expand the server name and then click the Firewall Policy node.
-
On the Firewall Policy node, click the Tasks tab on the Task pane and click the Publish a Mail Server link.
-
On the Welcome to the New Mail Server Publishing Rule Wizard page, enter a name for the rule in the Mail Server Publishing Rule name text box. In this example, we’ll name the rule Exchange Server. Click Next.
-
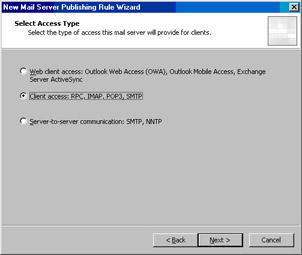
On the Select Access Type page, select the Client access: RPC, IMAP, POP3, SMTP option and click Next (see Figure 10.49).
-
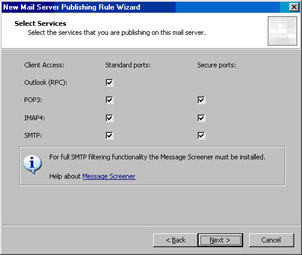
On the Select Services page, put a checkmark in each checkbox.This will allow us to connect to the Exchange server on the network services segment through the network services perimeter ISA firewall for all the services listed on this page. Note the comment on the page regarding the SMTP Message Screener. We will not deploy the message screener in this example, but you might want to consider it in your own deployment.You can install the SMTP Message Screener on the ISA firewall to filter both inbound and outbound mail. Even though the SMTP Message Screener won’t be enabled, the SMTP filter is enabled and will protect SMTP communications. Click Next (see Figure 10.50).
-
On the Select Server page, enter the IP address of the Exchange server on the network services segment in the Server IP address text box. In this example, the IP address is 10.0.0.2, so we enter that value. Click Next.
-
On the IP Addresses page, put a checkmark in the External checkbox. Click Next.
-
Click Finish on the Completing the New Mail Server Publishing Rule Wizard page.
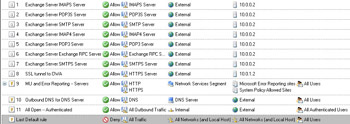
Your firewall policy should appear similar to that in Figure 10.51. Note that the Mail Server Publishing Rule Wizard added seven new Server Publishing Rules. Click Apply to save the changes and update the firewall policy. Click OK in the Apply New Configuration dialog box.
We need to do one more thing on the edge ISA firewall to make the Server Publishing Rules work correctly. Because there is a Route relationship between the Corpnet ISA fire-wall network and the network services segment, we will need to change the Server Publishing Rules on the edge ISA firewall so that the client requests appear to come from the edge ISA firewall.This allows us to use the Server Publishing Rules we created on the network services perimeter ISA firewall where the listener is listening on the Corpnet ISA firewall network.
Configuring the Server Publishing Rules to Use the ISA Firewall’s Address as the Source IP Address
For each Server Publishing Rule created by the Mail Server Publishing Wizard, perform the following steps:
-
Double click on one of the Server Publishing Rules created by the Server Publishing Rule Wizard.
-
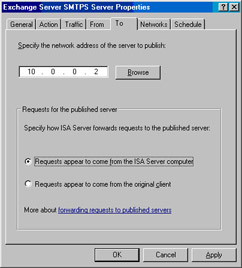
In the Properties dialog box for that rule, click the To tab.
-
On the To tab, select the Requests appear to come from the ISA Server computer option. Click OK (see Figure 10.52).

Figure 10.52: Specifying the Network Address of the Server to Publish -
Repeat the procedure for all the Server Publishing Rules created by the Mail Server Publishing Rule Wizard.
-
Click Apply to save the changes and update the firewall policy.
-
Click OK in the Apply New Configuration dialog box.











0 comments
Post a Comment