In my experience, one of the least understood issues with ISA firewall configuration relates to the settings in the Firewall client configuration on the ISA firewall. For each ISA firewall network, you can configure Firewall client settings that are used by Firewall client systems located on that ISA firewall network.These settings allow you to set how the Firewall client software finds the ISA firewall, what destination addresses should be remoted to the ISA fire-wall, and which ones should not be serviced by the Firewall client software.
The best way to learn how these settings work is to get into the configuration interface. Perform the following steps on the edge ISA firewall to configure the Firewall client settings:
-
In the ISA firewall console, expand the server name and then expand the Configuration node. Click the Networks node.
-
On the Networks node, double click the default Internal Network entry.
-
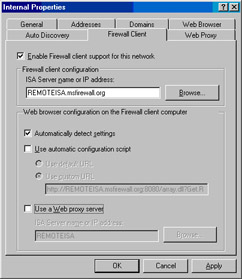
In the Internal Properties dialog box, click the Firewall Client tab. On the Firewall Client tab, confirm that there is a checkmark in the Enable Firewall client support for this network checkbox. When this option is enabled, the Firewall client listener port,TCP 1745, is enabled and listens for connections from the Firewall clients on that ISA firewall network. In the ISA Server name or IP address text box, enter the fully qualified domain name of the ISA firewall.This is a critical setting.The default entry in this text box is the NetBIOS name of the ISA firewall, which can create problems with name resolution.The name you enter into this text box is the name Firewall clients on the network will use to access the ISA firewall. If you leave just the NetBIOS name in this text box, there could be problems with name resolution related to fully qualifying the unqualified name. Although I am not saying that it won’t work to leave just the NetBIOS name in this text box, I am saying that you will avoid difficult-to-troubleshoot issues with Firewall clients if you use a fully qualified domain name (FQDN) in this text box. Put a checkmark in the Automatically detect settings checkbox and do not enable the Use automatic configuration script and Use a Web proxy server checkboxes.You will get autoconfiguration information by using autodiscovery, and you don’t need the Use a Web proxy server setting because the client will find the Web proxy filter component of the ISA firewall using the wpad settings (see Figure 10.57).
-
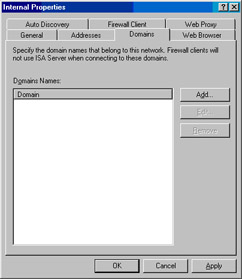
Click the Domains tab. On this tab, you enter your internal domain names so that the Firewall clients do not use the Firewall client software to handle connections to hosts on the internal domains.This is a tricky setting on multihomed ISA firewalls with multiple internal ISA firewall networks, but in this example, the edge ISA firewall has only a single internal network, so we won’t run into those issues. In this example, we have a single internal domain, which is msfirewall.org. Click Add to enter the internal network domain (see Figure 10.58).
-
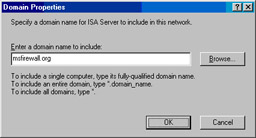
In the Domain Properties dialog box, enter the name of the internal domain in the Enter a domain name to include text box. Click OK (see Figure 10.59).
We can also configure the Web proxy client settings in the Properties dialog box of the ISA firewall network. Continue with the following steps to configure the Web proxy client configuration:
-
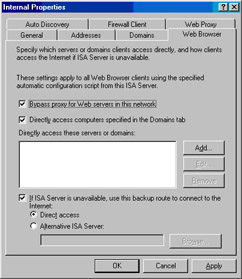
In the Internal Properties dialog box, click the Web Browser tab. On the Web Browser tab, confirm that there are checkmarks in the Bypass proxy for Web server in this network and Direct access computers specified in the Domains tab.The Bypass proxy for Web servers in this network setting allows the Web proxy client machines to bypass their Web proxy configuration when connecting to servers using a single label name. For example, http://server1 is a single label name. When the single label name is used, the Web browser ignores the Web proxy settings and connects directly to the Web server.This is known as Direct Access. When Direct Access is used, the client system must be able to resolve the name itself, as the ISA firewall does not handle the connection and therefore does not perform name resolution on behalf of the client.
The Directly access computers specified in the Domains tab option enables the web proxy client system to bypass the Web proxy configuration when connecting to hosts that belong to a domain included in the Domains tab.This is a useful option because the Web proxy client bypasses its Web proxy configuration and the ISA firewall when connecting to internal, trusted servers on the corporate network.
You can also add servers, domains, and addresses for Direct Access by clicking the Add button next to the Directly access these servers or domains list.You might want to put all the addresses in the ISA firewall network in the Direct Access list. For example, because we’re in the Internal Properties dialog box, we could include all the addresses in the default Internal network. In a multihomed, multiple internal network design, this can be used for authenticated access control.
-
Confirm that there is a checkmark in the If ISA Server is unavailable, use this backup route to connect to the Internet checkbox and that the Direct Access option is selected (see Figure 10.60).
The last thing we need to do in the Internal Properties dialog box is enable Autodiscovery publishing. Perform the following steps to enable the ISA firewall to publish autodiscovery information:
-
Click the Auto Discovery tab in the Internal Properties dialog box.
-
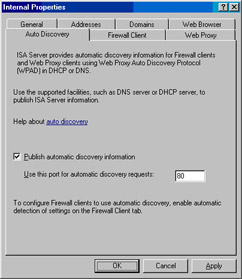
On the Auto Discovery tab, put a checkmark in the Publish automatic discovery information checkbox. Leave the default port listed in the Use this port for automatic discovery request text box as 80. We must use TCP port 80 because we are using DNS for our WPAD entry (see Figure 10.61).
-
Click OK in the Internal Properties dialog box.
-
Click Apply to save the changes and update the firewall policy.
-
Click OK in the Apply New Configuration dialog box.
Installing the Firewall Client Share on the Network Services Segment File Server
The Firewall client software will be installed on all the client systems on the Corpnet ISA firewall network. Note that you should install the Firewall client software only on network client systems, and avoid installing it on servers. Although it is possible to install the Firewall client software on servers, there is little reason to do so, because servers typically do not have logged-on users (that is, interactive logons).You will avoid difficult-to-diagnose connectivity issues if you do not install the Firewall client software on network servers.
Although some ISA firewall administrators choose to install the Firewall client share on the ISA firewall itself, I highly recommend against this practice, as it requires Windows file sharing protocol connections to be made to the ISA firewall device itself.This creates an increase in the ISA firewall’s attack surface that doesn’t need to be there. Instead, install the Firewall client share on a file server on the network services segment. Remember, the ISA firewall is a network-level security device and connections to and from the ISA firewall device should be severely limited.
Perform the following steps on the file server computer on the network services segment:
-
At the file server on the network services segment, place the ISA Server 2004 CD into the CD-ROM drive.The autorun menu will appear. If the autorun menu does not appear, double click the isaautorun.exe file on the CD.
-
In the ISA Server 2004 Setup autorun menu, click the Install ISA Server 2004 link.
-
Click Next on the Welcome to the Installation Wizard for Microsoft ISA Server 2004 page.
-
Select the I accept the terms in the license agreement option on the License Agreement page and click Next.
-
Enter your user information and product serial number on the Customer Information page and click Next.
-
Select the Custom option on the Setup Type page.
-
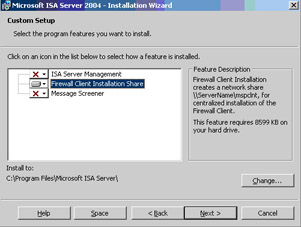
On the Custom Setup page, click the ISA Server Management icon and click the This feature will not be available option. Click the Firewall Client Installation Share icon and click the This feature, and all subfeatures, will be installed on local hard drive option. Click Next (see Figure 10.62).
-
Click Install on the Ready to Install the Program page.
-
Click Finish on the Installation Wizard Completed page.
-
Close the Internet Explorer window that presents a page on how to Protect the ISA Server Computer.
-
Click the Exit link on the ISA autorun menu.
The Firewall client share is now installed on the file server and can be accessed using the \\server_name\mspclnt\setup.exe Universal Naming Convention (UNC) path. Any user logged on as a local administrator can install the Firewall client software. However, if some of your users do not run as local administrators, you’ll need to find another way to install the Firewall client software.
Fortunately, the ideal solution to this problem is Active Directory Group Policy-based software installation. Because the client machines must be domain members to fully utilize the flexibility and increased security provided by the Firewall client, those domain members can have their Firewall client software installed automatically via Group Policy.
In the following procedure, we will create an Organizational Unit (OU) for machines that should have the Firewall client software automatically installed. We do this to prevent the Firewall client software from being installed on servers.There may be more elegant ways to approach this, such as using Group Policy filtering, but I’ll leave that up to the Active Directory guys to figure out the most efficient way to assign the Firewall client software only to client systems and not to servers.
Note that in the following example, we’ll create an OU that provides a Group Policy Object (GPO) linked to the OU that installs the Firewall client software. In a production environment, you will want to link other GPOs to the OU and order the GPO links appropriately.
Perform the following steps to create the OU, place a client system in the OU, and then use Software Installation to assign the Firewall client software to members of the OU:
-
On the domain controller on the network services segment, open the Active Directory Users and Computers console from the Administrative Tools menu.
-
Right click on the domain name, point to New, and click Organizational Unit.
-
In the New Object—Organizational Unit page, enter Firewall Client Systems in the Name text box. Click OK.
-
Click the Computers node and right click the client system name in the right pane of the console. Click Move.
-
In the Move dialog box, click the Firewall Client Systems node and click OK.
-
Right click the Firewall Client Systems OU and click Properties.
-
In the Firewall Client Systems Properties dialog box, click the Group Policy tab.
-
On the Group Policy tab, click the New button. Name the new GPO Firewall Client Installation and click Edit.
-
In the Group Policy Object Editor console, expand the Computer Configuration node and then expand the Software Settings node. Right click Software installation, point to New, and click Package.
-
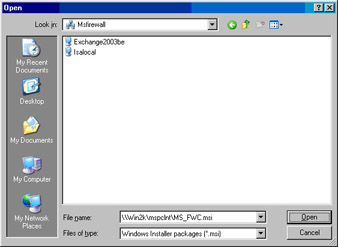
In the Open dialog box, enter the UNC path to the Firewall client installation package file. In this example, the path is \\Win2k\mspclnt\MS_FWC.msi. Click Open (see Figure 10.63).

Figure 10.63: Entering the UNC Path to the Firewall Client Installation Package File -
In the Deploy Software dialog box, select the Assigned option and click OK (see Figure 10.64).
-
Close the Group Policy Object Editor.
-
Close Active Directory Users and Computers.
-
Open a command prompt on the domain controller, enter gpupdate, and press Enter. When the client systems restart, the Firewall client software will install automatically.
Now the clients on the Corpnet ISA firewall network are ready to connect to resources on the network services segment and the Internet.
Open the Web browser on the client and go to www.isaserver.org.You’ll see log file entries on the edge ISA firewall that appear similar to those in Figure 10.65.
Now open a share on the file server on the network services segment.You’ll see entries like those in Figure 10.66.
Summary
We began this chapter with an in-depth discussion on network perimeters and how to design a functional network services segment via perimeterization. In subsequent sections, we provided detailed concepts and step-by-step instructions on how to configure the edge and network services perimeter ISA firewall to support secure connections from hosts located on the corporate network outside the perimeter to selected Exchange server services from Internet hosts









0 comments
Post a Comment