Creating New Public Folder Trees
![]() Unlike older versions of Exchange, Exchange Server 2003 allows the creation of more than one public folder tree structure. You could, for example, create separate public folder tree structures for different departments of the company. You could also create a public tree for a specific project. This helps you to better organize your public folders and more efficiently delegate authority over those folders. Keep in mind, though, that MAPI clients such as Outlook will be able to view information only in the default tree for the organization. For users to see other trees, they must use clients such as web browsers or newsreaders.
Unlike older versions of Exchange, Exchange Server 2003 allows the creation of more than one public folder tree structure. You could, for example, create separate public folder tree structures for different departments of the company. You could also create a public tree for a specific project. This helps you to better organize your public folders and more efficiently delegate authority over those folders. Keep in mind, though, that MAPI clients such as Outlook will be able to view information only in the default tree for the organization. For users to see other trees, they must use clients such as web browsers or newsreaders.
![]() There are three steps to creating a new public folder tree. First, you create a new top-level root folder that will house the new tree structure. Second, you create a new public folder store on the server to hold the new tree structure. Finally, you connect the new top-level folder to the new public folder store. This last step can be performed during the creation of the public folder store or later.
There are three steps to creating a new public folder tree. First, you create a new top-level root folder that will house the new tree structure. Second, you create a new public folder store on the server to hold the new tree structure. Finally, you connect the new top-level folder to the new public folder store. This last step can be performed during the creation of the public folder store or later.
 Creating a New Top-Level Root Folder
![]() The first step in creating a new public folder tree is to create a new top-level root folder. Each top-level root folder exists on the same level as the public folder tree and uses its own database on each Exchange server that contains replicas of any of the folders in the tree’s hierarchy. Exercise 6.8 outlines the steps for creating a new top-level root folder.
The first step in creating a new public folder tree is to create a new top-level root folder. Each top-level root folder exists on the same level as the public folder tree and uses its own database on each Exchange server that contains replicas of any of the folders in the tree’s hierarchy. Exercise 6.8 outlines the steps for creating a new top-level root folder.
-
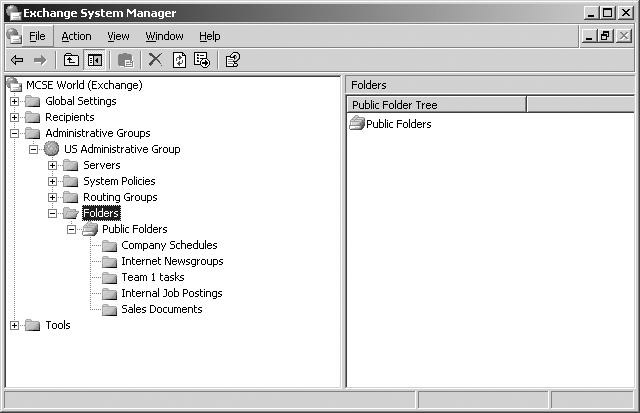
 Open the Exchange System Manager and select the Folders container for the administrative group in which you want to create the folder, as seen below. If you have only one administrative group, or if you have Exchange System Manager set to not display administrative groups, the Folders container should appear directly under the root node. Otherwise, you will need to drill down into the appropriate administrative group.
 -
 Right-click the Folders container and select New > Public Folder Tree from the context menu. This opens the Properties dialog box for the new folder.
 -
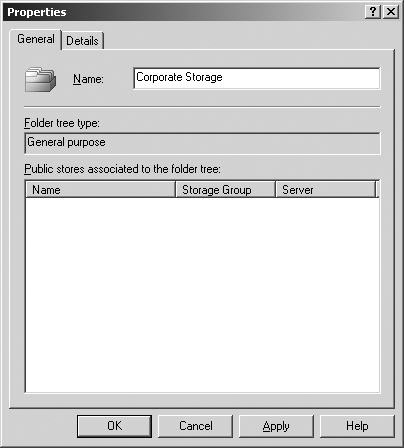
 Enter a name for the new tree in the Name field of the General property page, as seen below.
 -
 Once you have finished, click OK to close the property sheet and create the new public folder tree.
 Creating a New Public Folder Store
![]() Public folders reside in a Public Information Store. Each public folder tree uses its own database in the store. Once you create the new top-level root folder for a tree, you must then create a new public folder store to hold that tree. Exercise 6.9 outlines the steps for creating a new public folder store.
Public folders reside in a Public Information Store. Each public folder tree uses its own database in the store. Once you create the new top-level root folder for a tree, you must then create a new public folder store to hold that tree. Exercise 6.9 outlines the steps for creating a new public folder store.
-
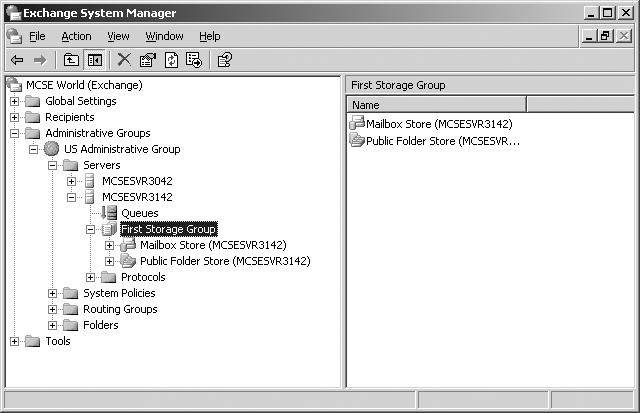
 In the Exchange System Manager, locate and select the container for the storage group on the server on which you want to create the new tree. You will create the new public folder store in this storage group, as seen below.
 -
 Right-click the selected storage group and select New > Public Store from the context menu. This opens the Properties dialog box for the new store.
 -
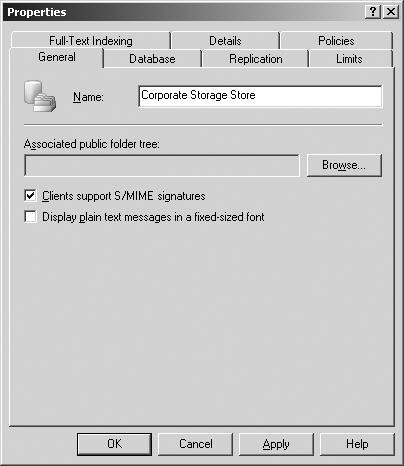
 Enter a name for the new store in the Name field of the General property page, as seen below.
 -
 Click the Browse button to open a dialog that lets you associate the new store with a public folder tree. In the dialog, select the tree you created previously. If you choose not to do this now, you can connect the tree and the new store later following the procedure outlined in the next section.
 -
 Once you have finished, click OK to close the property sheet.
 -
 System Manager prompts you to mount the new store once it has been successfully created. Click Yes to mount the new store.
Creating Dedicated Public Folder Servers
![]() A dedicated public folder server is an Exchange server that is used to store public folders and has no mailboxes. Dedicating a server for this purpose can increase client access to public folder data and can make for a more central backup strategy.
A dedicated public folder server is an Exchange server that is used to store public folders and has no mailboxes. Dedicating a server for this purpose can increase client access to public folder data and can make for a more central backup strategy.
![]() Implementing a dedicated public folder server involves the following steps:
Implementing a dedicated public folder server involves the following steps:
-
 Move public folders to the designated server. This can be done via replication, which is discussed later in the chapter.
 -
 If there are any mailboxes on the designated public folder server, they must be moved to another server or mail-disabled. Techniques for performing these actions are discussed in Chapter 5.
 -
 Remove any mailbox stores and unneeded storage groups from the server by right-clicking them and choosing Delete from the shortcut menu. For protection, you will not be allowed to delete any mailbox store that still has mail-enabled mailboxes in it.
![]() Dedicated public folder servers can be an appropriate part of an Exchange environment when there are large amounts of public folder data and you need to offload processing and disperse the workload. Dedicated servers also provide for a more central backup strategy.
Dedicated public folder servers can be an appropriate part of an Exchange environment when there are large amounts of public folder data and you need to offload processing and disperse the workload. Dedicated servers also provide for a more central backup strategy.
Public Folder Replication
![]() Public folders can be copied to other Exchange servers. Each copy of a public folder is called a replica. Each replica contains the same information as the original public folder but resides on a different Exchange server. Replicas can reside in the same routing group as the home server of the original public folder, and they can reside on servers in different routing groups.
Public folders can be copied to other Exchange servers. Each copy of a public folder is called a replica. Each replica contains the same information as the original public folder but resides on a different Exchange server. Replicas can reside in the same routing group as the home server of the original public folder, and they can reside on servers in different routing groups.
![]() Reasons for using public folder replicas include the following:
Reasons for using public folder replicas include the following:
![]() Load balancing If a large number of users access a particular public folder, access times could be slow. A solution is to create public folder replicas and disperse user access to the various replicas.
Load balancing If a large number of users access a particular public folder, access times could be slow. A solution is to create public folder replicas and disperse user access to the various replicas.
![]() Fault tolerance Having a public folder replicated eliminates a single point of failure.
Fault tolerance Having a public folder replicated eliminates a single point of failure.
![]() Easier access for remote users If routing groups are geographically separated and users are accessing public folders in a remote group, it can make sense to distribute those public folders to the other routing groups through the use of replicas. This can be especially useful when users in one routing group are accessing public folders in another routing group over an unreliable network connection. Creating replicas in each remote group would allow users to access the public folders on their own local networks.
Easier access for remote users If routing groups are geographically separated and users are accessing public folders in a remote group, it can make sense to distribute those public folders to the other routing groups through the use of replicas. This can be especially useful when users in one routing group are accessing public folders in another routing group over an unreliable network connection. Creating replicas in each remote group would allow users to access the public folders on their own local networks.
![]() The following is a scenario that could warrant the use of public folder replicas. Suppose your organization has four routing groups, each group consisting of two Exchange servers and 500 users. The four routing groups are connected with a 256-KB wide area network (WAN). The available bandwidth during the workday is less than 64 KB, while at night the available bandwidth is 128 KB or more. You have created a public folder that contains 600 MB of data that is not time critical. Users access that folder approximately every 15 minutes, and the folder data is updated only twice a week. A good strategy would be to create a replica of that public folder on an Exchange server in each of the four routing groups.
The following is a scenario that could warrant the use of public folder replicas. Suppose your organization has four routing groups, each group consisting of two Exchange servers and 500 users. The four routing groups are connected with a 256-KB wide area network (WAN). The available bandwidth during the workday is less than 64 KB, while at night the available bandwidth is 128 KB or more. You have created a public folder that contains 600 MB of data that is not time critical. Users access that folder approximately every 15 minutes, and the folder data is updated only twice a week. A good strategy would be to create a replica of that public folder on an Exchange server in each of the four routing groups.
![]() Public folder replication follows the multimaster replication model, in which every replica of a public folder is considered a master copy. When you decide which folders you want to replicate, you manually create and configure those replicas. Any change made to a public folder is automatically replicated to other replicas of that folder by the Exchange Public Folder Replication Agent (PFRA) service based on settings you configure. Replication is a mail-based process that uses SMTP as its transport mechanism.
Public folder replication follows the multimaster replication model, in which every replica of a public folder is considered a master copy. When you decide which folders you want to replicate, you manually create and configure those replicas. Any change made to a public folder is automatically replicated to other replicas of that folder by the Exchange Public Folder Replication Agent (PFRA) service based on settings you configure. Replication is a mail-based process that uses SMTP as its transport mechanism.
 Creating Public Folder Replicas
![]() The method for configuring replication involves pushing replicas from one public folder store to other public folder stores using the property pages of the public folder that you want to replicate. Exercise 6.10 outlines the steps for creating a replica of a public folder.
The method for configuring replication involves pushing replicas from one public folder store to other public folder stores using the property pages of the public folder that you want to replicate. Exercise 6.10 outlines the steps for creating a replica of a public folder.
-
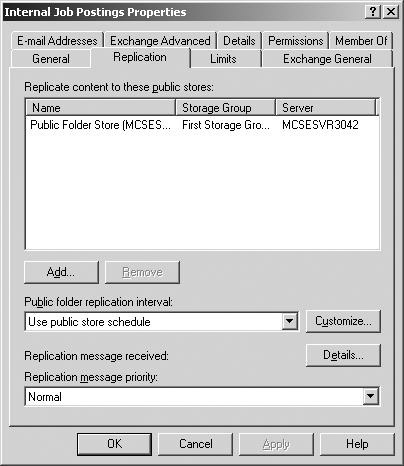
 In Exchange System Manager, open the property page of the public folder for which you want to create replicas, and switch to the Replication property page.
 -
 On this property page, you’ll find a list of public stores that already contain a replica of the public folder. Click the Add button to open a dialog that contains a list of available public stores in your organization that do not already have replicas of the folder.
 -
 Select the store to which you want to replicate the folder, and click OK.
 -
 The public store is added to the list of stores that contain replicas. Below the list of public folder stores, you’ll find a drop-down menu named Public Folder Replication Interval. Use this menu to schedule the replication of the public folder to the other public folder stores. You have several options here:
-
 The Never Run option turns off replication of the public folder, which is handy if you want to stop the replication temporarily to do something like troubleshoot a bad connector.
 -
 The Always Run option essentially keeps replication going all of the time. Because this would cause excessive traffic, it is generally a poor option to choose. However, there is one time when it is a useful option. When you first configure a new replica and you want the public folder content of that new replica to be transferred as soon as possible, you can turn on the Always Run option to ensure that the content will be replicated quickly. Be sure that you set the schedule to something more reasonable afterward, however.
 -
 The Run Every 1, 2, Or 4 Hours options cause replication to occur at the defined intervals.
 -
 The Use Custom Schedule option allows you to click the Customize button to bring up a dialog with a calendar of hours that you can use to set up the replication schedule.
 -
 The Use Public Store Schedule option is the default setting and causes the folder to replicate according to the default replication schedule set for the public folder store to which the public folder belongs.
-
-
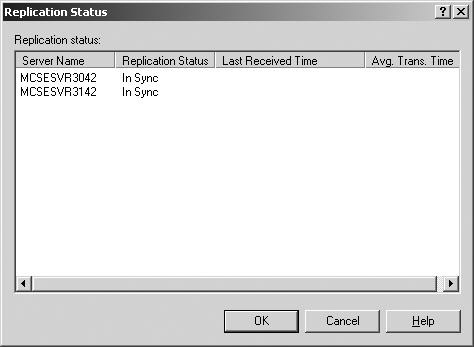
 Click the Details button to bring up a dialog with information about the last replication message Exchange Server generated regarding the current public folder, as seen below.
 -
 Use the Replication Message Priority drop-down list to set the priority that replication messages concerning this folder should take in your Exchange system.
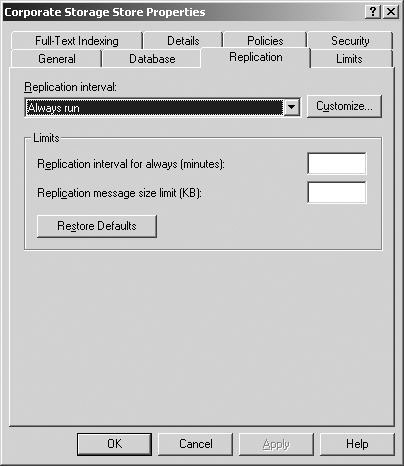
![]() Once you have created replicas of a public folder and configured how replication should behave at the folder level, you can also configure how replication should behave at the public store level. To do this, open the property page for the Public Folder Store object, and switch to the Replication property page, shown in Figure 6.10.
Once you have created replicas of a public folder and configured how replication should behave at the folder level, you can also configure how replication should behave at the public store level. To do this, open the property page for the Public Folder Store object, and switch to the Replication property page, shown in Figure 6.10.
![]() The first action you can perform on this page is to configure replication defaults that apply to all of the folders in that store. Do this using the same type of drop-down menu that you used to configure a schedule for the individual folder. If you do not specifically set a schedule for an individual folder (if you leave it at its default setting), the folder will use the schedule set for the public folder store to which the folder belongs. If you set a schedule for an individual folder, that schedule overrides the public folder store schedule.
The first action you can perform on this page is to configure replication defaults that apply to all of the folders in that store. Do this using the same type of drop-down menu that you used to configure a schedule for the individual folder. If you do not specifically set a schedule for an individual folder (if you leave it at its default setting), the folder will use the schedule set for the public folder store to which the folder belongs. If you set a schedule for an individual folder, that schedule overrides the public folder store schedule.
![]() The second action you can perform on the Replication property page is to define limits for replication. By default, no limits are defined, but you can specify the maximum time, in minutes, that replication is allowed to go on when replication occurs. You can also define the maximum size, in kilobytes, that a single replication message may be.
The second action you can perform on the Replication property page is to define limits for replication. By default, no limits are defined, but you can specify the maximum time, in minutes, that replication is allowed to go on when replication occurs. You can also define the maximum size, in kilobytes, that a single replication message may be.
 Synchronizing Replicas
![]() The Public Information Store uses three primary constructs to keep track of replication throughout an organization and to determine whether a public folder is synchronized. These constructs include the following:
The Public Information Store uses three primary constructs to keep track of replication throughout an organization and to determine whether a public folder is synchronized. These constructs include the following:
-
 A change number is made up of a globally unique identifier for the Information Store and a change counter that is specific to the server on which a public folder resides. When a user modifies (or creates) a message in a public folder, the PFRA for that Information Store assigns a new change number to the message.
![]() The PFRA also assigns a time stamp to messages as soon as they arrive in a public folder and a new time stamp whenever a message is modified.
The PFRA also assigns a time stamp to messages as soon as they arrive in a public folder and a new time stamp whenever a message is modified.
![]() The predecessor change list for a message is a list of all of the Information Stores that have made changes to a message and the most recent change number assigned by each Information Store on the list.
The predecessor change list for a message is a list of all of the Information Stores that have made changes to a message and the most recent change number assigned by each Information Store on the list.
![]() Together, these constructs are referred to as message state information and play a role in message creation, deletion, and modification.
Together, these constructs are referred to as message state information and play a role in message creation, deletion, and modification.
Message Creation
![]() When a new message is created in a folder, the Information Store receiving the message assigns a change number to the message and deposits it in the folder. The message is replicated to other replicas of the folder during the normal replication schedule.
When a new message is created in a folder, the Information Store receiving the message assigns a change number to the message and deposits it in the folder. The message is replicated to other replicas of the folder during the normal replication schedule.
Message Deletion
![]() When a message is deleted from a folder, the Information Store running the replica in which the message is deleted sends a replication message to all other Information Stores that host a replica of the folder. When each Information Store receives the replication message, it removes the deleted message from its own replica.
When a message is deleted from a folder, the Information Store running the replica in which the message is deleted sends a replication message to all other Information Stores that host a replica of the folder. When each Information Store receives the replication message, it removes the deleted message from its own replica.
Message Expiration
![]() When a message expires (reaches the configured age limit for messages in the folder), the Information Store deletes the message from the folder but does not send a replication message to other Information Stores. Each Information Store removes expired messages from its own folders based on settings made for the store itself and for the folder. Thus, it is possible for different stores to expire a message at different times.
When a message expires (reaches the configured age limit for messages in the folder), the Information Store deletes the message from the folder but does not send a replication message to other Information Stores. Each Information Store removes expired messages from its own folders based on settings made for the store itself and for the folder. Thus, it is possible for different stores to expire a message at different times.
Message Modification
![]() When a change is made to a message in one replica of a public folder, the PFRA for that Information Store updates the message state information for that message and sends a replication message to other Information Stores on which replicas of the folder exist. This replication message contains the modified message and all of its attachments.
When a change is made to a message in one replica of a public folder, the PFRA for that Information Store updates the message state information for that message and sends a replication message to other Information Stores on which replicas of the folder exist. This replication message contains the modified message and all of its attachments.
![]() When another Information Store receives such a replication message, the modified message inside is used to replace the original message in that store if the message state information determines that the message is indeed newer than the original, based on its time stamp.
When another Information Store receives such a replication message, the modified message inside is used to replace the original message in that store if the message state information determines that the message is indeed newer than the original, based on its time stamp.
![]() While the PFRA sends out replication messages, there is no mechanism in place for ensuring that replication messages reach their destination. The logic behind this is that generating an extra confirmation message for each replication message would unnecessarily double the amount of traffic involved in replication. Thus, it is possible for a message in different replicas of a public folder to become out of sync. A process known as backfill is used to remedy this situation. During regular maintenance, status messages are sent between servers, and change numbers for messages on different replicas are compared. If a server is found to be out of sync, it then generates a backfill request for any changes that have not yet been received.
While the PFRA sends out replication messages, there is no mechanism in place for ensuring that replication messages reach their destination. The logic behind this is that generating an extra confirmation message for each replication message would unnecessarily double the amount of traffic involved in replication. Thus, it is possible for a message in different replicas of a public folder to become out of sync. A process known as backfill is used to remedy this situation. During regular maintenance, status messages are sent between servers, and change numbers for messages on different replicas are compared. If a server is found to be out of sync, it then generates a backfill request for any changes that have not yet been received.

0 comments
Post a Comment