
Managing Public Folders with Outlook
![]() Office Outlook 2003 can be used to create public folders and perform a certain degree of public folder management. You can also use previous versions of Outlook, the Microsoft Exchange Client, and certain generic mail clients (specifically IMAP4 clients) to create public folders, but these applications may not provide the same level of management as Outlook 2003. Because the procedures for creation are fairly similar, this section focuses only on the use of Outlook 2003 in working with public folders.
Office Outlook 2003 can be used to create public folders and perform a certain degree of public folder management. You can also use previous versions of Outlook, the Microsoft Exchange Client, and certain generic mail clients (specifically IMAP4 clients) to create public folders, but these applications may not provide the same level of management as Outlook 2003. Because the procedures for creation are fairly similar, this section focuses only on the use of Outlook 2003 in working with public folders.
 Creating Public Folders in Outlook
![]() Creating folders in Outlook 2003 is simple. Just make sure that the All Public Folders object (or the folder in which you want to create a new folder) is highlighted, and select the New Folder command from the File menu. The process for creating a new folder is outlined in Exercise 6.1.
Creating folders in Outlook 2003 is simple. Just make sure that the All Public Folders object (or the folder in which you want to create a new folder) is highlighted, and select the New Folder command from the File menu. The process for creating a new folder is outlined in Exercise 6.1.
- Start Outlook.
- Make sure that the public folder tree is showing by selecting the List command from the View menu.
- In the List view, expand the Public Folders item.
- To create a top-level folder, select the All Public Folders object. You can also select another folder in which you want to create a subfolder.
- With a public folder selected, choose New Folder from Outlook’s File menu. This opens the Create New Folder dialog box seen below.
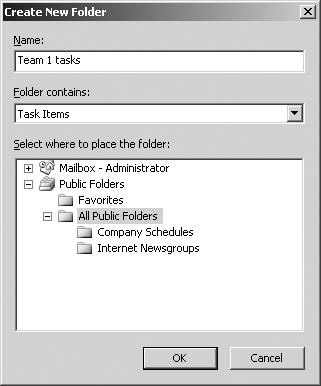
- Enter the name of the public folder you want to create and the type of items the folder should contain, and select the folder in which the new folder should be created. The default folder is the one that was selected when you issued the New Folder command.
- Assuming you have the appropriate permissions to create a folder in the chosen location (and, by default, all users can create folders wherever they want), the folder is created and may be accessed by other users immediately. Keep in mind, though, that it may take some time for the public folder hierarchy to replicate itself throughout Active Directory, so it may take some time before all users can see the folder in their lists. The results of this exercise are displayed below.


Configuring Public Folders from Outlook
![]() After a public folder is created, it is managed using both Outlook and Exchange System Manager. Because users can create public folders with Outlook, it is advantageous to allow them certain managerial responsibilities, which is why part of the management occurs in the client.
After a public folder is created, it is managed using both Outlook and Exchange System Manager. Because users can create public folders with Outlook, it is advantageous to allow them certain managerial responsibilities, which is why part of the management occurs in the client.
![]() When a user creates a public folder, that user automatically becomes the folder’s owner. The owner is responsible for the folder’s basic design, which includes access permissions, rules, and the association of electronic forms. To perform these management tasks, the user can simply open the property sheets for a particular public folder in Outlook. Public folders can also be managed to a degree from within Exchange System Manager (discussed later), but the Outlook option means that the user has only a single application with which to be concerned.
When a user creates a public folder, that user automatically becomes the folder’s owner. The owner is responsible for the folder’s basic design, which includes access permissions, rules, and the association of electronic forms. To perform these management tasks, the user can simply open the property sheets for a particular public folder in Outlook. Public folders can also be managed to a degree from within Exchange System Manager (discussed later), but the Outlook option means that the user has only a single application with which to be concerned.
![]() The key configuration elements of public folders in Outlook are as follows:
The key configuration elements of public folders in Outlook are as follows:
![]() These elements are managed through a set of property pages that are used for configuration. There are two ways to display these property pages. One way is to highlight the public folder, click the right mouse button, and choose Properties from the pop-up menu that appears. Another way is to highlight the public folder and then choose Folders > Properties For <Public Folder Name> from the File menu.
These elements are managed through a set of property pages that are used for configuration. There are two ways to display these property pages. One way is to highlight the public folder, click the right mouse button, and choose Properties from the pop-up menu that appears. Another way is to highlight the public folder and then choose Folders > Properties For <Public Folder Name> from the File menu.
Permissions
![]() By assigning permissions, a public folder owner can choose which users have access to the folder and what actions those users may perform. There are eight individual permissions and nine groupings of permissions, called roles, that can be assigned. Table 6.1 describes these permissions, descending from the permission with the most capabilities to the permission with the fewest capabilities. The word items, as used in this table, refers to the contents of the public folder, such as e-mail messages, forms, documents, and other files.
By assigning permissions, a public folder owner can choose which users have access to the folder and what actions those users may perform. There are eight individual permissions and nine groupings of permissions, called roles, that can be assigned. Table 6.1 describes these permissions, descending from the permission with the most capabilities to the permission with the fewest capabilities. The word items, as used in this table, refers to the contents of the public folder, such as e-mail messages, forms, documents, and other files.
![]() Table 6.2 lists the predefined groupings of permissions according to role.
Table 6.2 lists the predefined groupings of permissions according to role.
|
|
|
|---|---|
|
|
|
|
|
|
|
|
|
|
|
|
|
|
|
|
|
|
|
|
|
|
|
|
|
|
|
|
|
|
|
|
|
|
|---|---|---|---|---|---|---|---|---|
|
|
|
|
|
|
|
|
|
|
|
|
|
|
|
|
|
|
|
|
|
|
|
|
|
|
|
|
|
|
|
|
|
|
|
|
|
|
|
|
|
|
|
|
|
|
|
|
|
|
|
|
|
|
|
|
|
|
|
|
|
|
|
|
|
|
|
|
|
|
|
|
|
|
|
|
|
|
|
|
|
|
|
|
|
|
|
|
|
|
![]() Custom roles consisting of any combination of individual permissions may also be assigned. When a public folder is created, the following three users are included on the permissions list by default (see Figure 6.4):
Custom roles consisting of any combination of individual permissions may also be assigned. When a public folder is created, the following three users are included on the permissions list by default (see Figure 6.4):


![]() The user who created the public folder This user is automatically assigned the Owner role. In Figure 6.4, the owner of the folder is the Administrator account. The owner of a folder may also grant other users this role.
The user who created the public folder This user is automatically assigned the Owner role. In Figure 6.4, the owner of the folder is the Administrator account. The owner of a folder may also grant other users this role.
![]() A special user named Default This user represents all users who have access to the public folder store but aren’t explicitly listed in the permissions list. In top-level folders, the Default user is automatically granted the Author role (this can be modified). Below the top-level folders, the Default user automatically inherits the permissions it has at its parent folder.
A special user named Default This user represents all users who have access to the public folder store but aren’t explicitly listed in the permissions list. In top-level folders, the Default user is automatically granted the Author role (this can be modified). Below the top-level folders, the Default user automatically inherits the permissions it has at its parent folder.
![]() A special user named Anonymous The Anonymous user represents all users logged on with Anonymous access. For example, an Exchange server could contain public folders holding promotional information for public viewing. People without user accounts could use a web browser or newsreader program and the Anonymous account to access the Exchange server and read the promotional information. Any permissions assigned to the Anonymous account are applied to these users.
A special user named Anonymous The Anonymous user represents all users logged on with Anonymous access. For example, an Exchange server could contain public folders holding promotional information for public viewing. People without user accounts could use a web browser or newsreader program and the Anonymous account to access the Exchange server and read the promotional information. Any permissions assigned to the Anonymous account are applied to these users.
![]() These three users cannot be removed from the permissions list of a public folder. However, the particular roles and permissions they have can be modified. All other users can be removed from the permissions list.
These three users cannot be removed from the permissions list of a public folder. However, the particular roles and permissions they have can be modified. All other users can be removed from the permissions list.
| Note |
|
![]() Exercise 6.2 outlines the steps to configure the permissions on a public folder.
Exercise 6.2 outlines the steps to configure the permissions on a public folder.
- In Outlook, highlight the public folder. Click the right mouse button, and choose Properties from the pop-up menu. The Properties dialog box for the folder appears.
- Click the Permissions tab. Notice the permissions given to the Default user. The Default user is given the Author role by default for top-level folders and whatever permissions it has for the parent folder of all other folders. Notice also that the user who created this public folder has the Owner role.
- Highlight the Default user, and then click the down-arrow in the Roles field. Choose the None role from the list.
- Click Add, and highlight a new user from the list. Next, click Add, and then click OK. The user is added to the access list for the public folder with the role of None. This role was automatically assigned because the Default user’s role is None, as you can see below.

- Change the new user’s role to Author. Notice that the new user now has the Create Items and Read Items permissions. This role also allows the user to edit and delete the user’s own items.
- Click OK to save the configuration.

- In Outlook, highlight the public folder. Click the right mouse button, and choose Properties from the pop-up menu. The Properties dialog box for the folder appears.
- Click the Forms tab. Notice that there are currently no forms associated with this public folder but that the Allow These Forms In This Folder field is set to Any Form. You are going to associate a specific form with this folder and configure it as the only form to be used with this folder.

- Click the Manage button. The Forms Manager appears, listing the forms published in the Organization Forms library.
- Click a form, and then click Copy. If the form has already been installed, all you have to do now is click Close. Otherwise, you’ll be walked through some extra steps for installing the form. Notice that the form is now associated with this public folder.
- Under the Allow These Forms In This Folder field, choose Only Forms Listed Above, and then click OK. The form installation performed in this exercise will be tested in the upcoming section, “Using Public Folders.”

Forms
![]() Forms can be associated with a public folder, allowing users to submit structured data into the folder. The list of forms associated with a public folder is found in the folder’s property pages. Exercise 6.3 walks through the steps to associate a form with a public folder.
Forms can be associated with a public folder, allowing users to submit structured data into the folder. The list of forms associated with a public folder is found in the folder’s property pages. Exercise 6.3 walks through the steps to associate a form with a public folder.
Rules
![]() Rules consisting of conditions and actions can be configured on public folders. Rules allow a public folder to automate certain procedures. The following is a list of some of the conditions (or criteria) that can be used in a rule:
Rules consisting of conditions and actions can be configured on public folders. Rules allow a public folder to automate certain procedures. The following is a list of some of the conditions (or criteria) that can be used in a rule:
![]() From A message from specified recipients
From A message from specified recipients
![]() Sent To A message sent to specified recipients
Sent To A message sent to specified recipients
![]() Subject Specified text in the Subject heading of a message
Subject Specified text in the Subject heading of a message
![]() Message Body Specified text or phrase in the body of a message
Message Body Specified text or phrase in the body of a message
![]() Size A specified size of a message, “At least x size” or “At most x size”
Size A specified size of a message, “At least x size” or “At most x size”
![]() Received A specified date range within which a message was received
Received A specified date range within which a message was received
![]() The following actions can be triggered if the preceding conditions are met:
The following actions can be triggered if the preceding conditions are met:
![]() Delete Delete the message.
Delete Delete the message.
![]() Reply With Reply to the message’s sender with a specified message template.
Reply With Reply to the message’s sender with a specified message template.
![]() Forward To Forward the message to specified recipients.
Forward To Forward the message to specified recipients.
![]() A rule could be used, for example, to keep postings separate from replies. If a company had a public folder named Company Events containing information on upcoming company events, users could be given permission to provide feedback on these events by sending replies to this folder. However, the number of replies in this folder could hinder users from finding the original events posting. To resolve this, the owner of this folder could create a subfolder called Discussions. The owner could then create a rule for Company Events that states that all replies to this folder should be forwarded to the Discussions folder. For this example to work, the preceding folders must be visible in the GAL.
A rule could be used, for example, to keep postings separate from replies. If a company had a public folder named Company Events containing information on upcoming company events, users could be given permission to provide feedback on these events by sending replies to this folder. However, the number of replies in this folder could hinder users from finding the original events posting. To resolve this, the owner of this folder could create a subfolder called Discussions. The owner could then create a rule for Company Events that states that all replies to this folder should be forwarded to the Discussions folder. For this example to work, the preceding folders must be visible in the GAL.
![]() Rules are added to public folders by clicking the Folder Assistant button on a folder’s Administration property page. Clicking this button displays the Folder Assistant dialog box, which enables you to add, edit, delete, and order rules for a public folder. Exercise 6.4 outlines the steps involved in creating a rule on a public folder.
Rules are added to public folders by clicking the Folder Assistant button on a folder’s Administration property page. Clicking this button displays the Folder Assistant dialog box, which enables you to add, edit, delete, and order rules for a public folder. Exercise 6.4 outlines the steps involved in creating a rule on a public folder.
- In Outlook, highlight the public folder. Click the right mouse button, and choose Properties from the pop-up menu. The Properties dialog box for the folder appears.
- Click the Administration tab, seen below.

- Click the Folder Assistant button. The Folder Assistant dialog box appears, as seen below.

- Click Add Rule. The Edit Rule dialog box appears. In the Subject field, type a word that should appear in the subject, and type the same word again in the Message Body field. This is the condition part of the rule and stipulates that any message that contains the chosen word in the subject or body of the message fits the criteria.
- Now set the action part of the rule. Click the Forward check box, and then click To. The Choose Recipient dialog box appears. In the Show Names From The field, choose Global Address List.
- Choose the user you want to automatically forward the message to, and then click the To button.
- Click OK, and then click OK on the next three dialog boxes to close all open dialog boxes. The rule is now saved within the properties of the public folder.


|
|
|
|---|---|
|
|
|
|
|
|
|
|
|
Views
![]() Outlook includes many powerful features to view items in a folder. Some of the features in Outlook are listed in Table 6.3.
Outlook includes many powerful features to view items in a folder. Some of the features in Outlook are listed in Table 6.3.
Using Public Folders
![]() This section and its exercises cover how to add content to a public folder. The two primary methods to add content to a public folder are as follows:
This section and its exercises cover how to add content to a public folder. The two primary methods to add content to a public folder are as follows:
- Posting forms
- Sending e-mail messages
Posting
![]() If a public folder is configured to accept postings, which is the default, users who have the necessary permissions can post data to the public folder. To post, a user must highlight the public folder and either click the New Post icon on the toolbar or choose New Post In This Folder from the Compose menu. Posting is an easy and efficient method of adding content to a public folder, because the user does not have to address the message as they do when sending a mail message to a public folder. Exercise 6.5 outlines the steps for this procedure.
If a public folder is configured to accept postings, which is the default, users who have the necessary permissions can post data to the public folder. To post, a user must highlight the public folder and either click the New Post icon on the toolbar or choose New Post In This Folder from the Compose menu. Posting is an easy and efficient method of adding content to a public folder, because the user does not have to address the message as they do when sending a mail message to a public folder. Exercise 6.5 outlines the steps for this procedure.
- In Outlook, select the public folder you want to post into.
- Click the New Post icon on the Outlook toolbar to open a posting.
- Enter the subject and body text, as seen below.

- Post the message to the public folder.
- The new posting appears in the public folder.

Mail Messages
![]() A mail message can be sent to a public folder. As you may recall, a public folder is a recipient and, therefore, can receive and send messages. Exercise 6.6 outlines the steps to send a mail message to a public folder.
A mail message can be sent to a public folder. As you may recall, a public folder is a recipient and, therefore, can receive and send messages. Exercise 6.6 outlines the steps to send a mail message to a public folder.
| Note |
|
- In Outlook, choose Compose > New Message. An untitled mail-message window appears.
- Click To. In the Show Names From The field, choose Global Address List. Find the public folder in the Global Address List.
- Select the public folder, click the To button, and then click OK.
- Type an appropriate subject in the Subject field.
- Type some information in the body of the message.
- Click the Send icon in the toolbar.
Managing Public Folders with System Manager
![]() The Exchange System Manager provides a second way to create public folders and also provides many configuration options that are different than those available from within Outlook.
The Exchange System Manager provides a second way to create public folders and also provides many configuration options that are different than those available from within Outlook.
Creating Public Folders in System Manager
![]() In older versions of Exchange Server, you could create public folders only by using an Exchange client such as Outlook. Fortunately, Exchange Server 2003 allows you to perform this task from within the Exchange System Manager, offering Exchange administrators an easier way to create and manage public folders using only one tool. Exercise 6.7 outlines the steps for creating a public folder using System Manager.
In older versions of Exchange Server, you could create public folders only by using an Exchange client such as Outlook. Fortunately, Exchange Server 2003 allows you to perform this task from within the Exchange System Manager, offering Exchange administrators an easier way to create and manage public folders using only one tool. Exercise 6.7 outlines the steps for creating a public folder using System Manager.
- Expand the public folder tree in which you want to create a new folder. If you have not created additional trees beyond the All Public Folders default tree, then expand that default tree.
- If you want to make a top-level folder, select the tree object itself. Otherwise, navigate through the tree, and select the folder in which you want to create the new subfolder, as seen below.

- Right-click in the public folder tree where you want to create the new public folder and select New > Public Folder.
- In the Name field, enter a name for the new public folder.
- Optionally, type a description for the public folder that will appear in the Global Address List.
- Click the OK button to create the new public folder. The folder will immediately be available to users.

Mail-Enabling a Public Folder
![]() Once you have created a new public folder, you will still need to mail-enable the folder and configure mail-related settings if you want the public folder to be able to receive e-mail messages. If you choose not to do this, users will be able to post messages only by using a MAPI client.
Once you have created a new public folder, you will still need to mail-enable the folder and configure mail-related settings if you want the public folder to be able to receive e-mail messages. If you choose not to do this, users will be able to post messages only by using a MAPI client.
![]() All public folders in the default tree and any general-purpose trees are not mail-enabled by default. If any folder in any tree is made mail-enabled, it becomes visible in the GAL by default.
All public folders in the default tree and any general-purpose trees are not mail-enabled by default. If any folder in any tree is made mail-enabled, it becomes visible in the GAL by default.
![]() To mail-enable a folder, select the folder in Exchange System Manager and choose All Tasks > Mail Enable from the Action menu. The command should take effect immediately, although you will get no feedback from the Exchange System Manager after executing it. Once you have mail-enabled a folder, that folder’s property sheet shows several extra mail-related property pages, including Exchange General, E-mail Addresses, and Exchange Advanced. These property pages work the same as the similar property pages for other recipients and allow you to perform such functions as setting delivery options and restrictions, changing the display name and alias, and setting custom attributes. Since Chapter 5 provided detailed coverage of performing these actions on other types of recipients, we refer you to that chapter for the specifics.
To mail-enable a folder, select the folder in Exchange System Manager and choose All Tasks > Mail Enable from the Action menu. The command should take effect immediately, although you will get no feedback from the Exchange System Manager after executing it. Once you have mail-enabled a folder, that folder’s property sheet shows several extra mail-related property pages, including Exchange General, E-mail Addresses, and Exchange Advanced. These property pages work the same as the similar property pages for other recipients and allow you to perform such functions as setting delivery options and restrictions, changing the display name and alias, and setting custom attributes. Since Chapter 5 provided detailed coverage of performing these actions on other types of recipients, we refer you to that chapter for the specifics.
Hiding Public Folders
![]() Public folders can be hidden from the GAL and the public folder hierarchy. Hiding public folders can be part of your security plan. By default, each public folder is not hidden from the GAL. A public folder can be hidden by selecting the Hide From Exchange Address Lists check box found on its Exchange Advanced property page, seen in Figure 6.5.
Public folders can be hidden from the GAL and the public folder hierarchy. Hiding public folders can be part of your security plan. By default, each public folder is not hidden from the GAL. A public folder can be hidden by selecting the Hide From Exchange Address Lists check box found on its Exchange Advanced property page, seen in Figure 6.5.


![]() Before you can hide a public folder from the GAL, however, you will need to first mail-enable it from the Exchange System Manager, as discussed previously in the “Mail-Enabling a Public Folder” section.
Before you can hide a public folder from the GAL, however, you will need to first mail-enable it from the Exchange System Manager, as discussed previously in the “Mail-Enabling a Public Folder” section.
Latency Issues with Public Folder Hierarchy and Content
![]() One Exchange service (the Public Folder Replication Agent) manages the replication of public folders, while another service (the System Attendant) manages the listing of public folders in the Global Address List. Because of this segregated management, you may notice a number of latency issues, especially when working with large public folder trees. These issues include the following:
One Exchange service (the Public Folder Replication Agent) manages the replication of public folders, while another service (the System Attendant) manages the listing of public folders in the Global Address List. Because of this segregated management, you may notice a number of latency issues, especially when working with large public folder trees. These issues include the following:
- Sometimes public folder trees appear differently when managed from two different servers. This is usually because changes to the public folder hierarchy have not yet been replicated to all servers.
- Users may see the public folder hierarchy in their MAPI client but not be able to see the individual public folders in their address book until both services have replicated their information.
- Certain properties may appear incorrectly (or not at all) in System Manager because the replication of the hierarchy has taken place faster than the directory information.
Configuring Public Folders in System Manager
![]() No matter how you create a public folder, it becomes accessible to users almost immediately, using the default configurations. As you saw earlier in the chapter, a good bit of public folder configuration is available from within the Outlook client so that users can take on some of the administrative burden of creating and maintaining public folders. However, there is also a good bit of configuration available for public folders that can be accomplished only by using the Exchange System Manager.
No matter how you create a public folder, it becomes accessible to users almost immediately, using the default configurations. As you saw earlier in the chapter, a good bit of public folder configuration is available from within the Outlook client so that users can take on some of the administrative burden of creating and maintaining public folders. However, there is also a good bit of configuration available for public folders that can be accomplished only by using the Exchange System Manager.
![]() By default, all public folders and their contents are visible in the public folder hierarchy to all other recipients. To hide the contents of a particular public folder, you must revoke the Read Items permission for the recipient or recipients at that particular folder. If you wanted to hide not merely the contents of a public folder but also its very listing in the hierarchy, you would revoke the Read Items permission for the parent folder of the folder you want hidden. Since a subfolder is considered part of the contents of its parent folder, revoking this permission at the parent folder would prevent the viewing of that subfolder in the hierarchy.
By default, all public folders and their contents are visible in the public folder hierarchy to all other recipients. To hide the contents of a particular public folder, you must revoke the Read Items permission for the recipient or recipients at that particular folder. If you wanted to hide not merely the contents of a public folder but also its very listing in the hierarchy, you would revoke the Read Items permission for the parent folder of the folder you want hidden. Since a subfolder is considered part of the contents of its parent folder, revoking this permission at the parent folder would prevent the viewing of that subfolder in the hierarchy.
![]() Many times, an organization will create a top level called Hidden Folders that will contain all the folders they want hidden from the majority of their users. The Default user will be assigned the None role for Hidden Folders, which will prevent them from viewing all subfolders. Even the top-level folder Hidden Folders could be made invisible by revoking the Folder Visible permission from the Default user. To enable the users who do need to access the subfolders under this root, you would create distribution lists and assign the relevant permissions at this root and any subfolders.
Many times, an organization will create a top level called Hidden Folders that will contain all the folders they want hidden from the majority of their users. The Default user will be assigned the None role for Hidden Folders, which will prevent them from viewing all subfolders. Even the top-level folder Hidden Folders could be made invisible by revoking the Folder Visible permission from the Default user. To enable the users who do need to access the subfolders under this root, you would create distribution lists and assign the relevant permissions at this root and any subfolders.
![]() Within Exchange System Manager, public folders are managed at two distinct levels. The first is at the level of the public folder store, where you configure settings governing how the public folder store should handle public folders in general. The second is at the level of the public folder itself, where you configure properties that control certain aspects of the folder and often override settings made at the store level.
Within Exchange System Manager, public folders are managed at two distinct levels. The first is at the level of the public folder store, where you configure settings governing how the public folder store should handle public folders in general. The second is at the level of the public folder itself, where you configure properties that control certain aspects of the folder and often override settings made at the store level.
Configuring Public Folder Store Properties
![]() The public folder properties managed at the level of a public folder store govern the default settings for all public folders in that store. As with most other objects, the settings for the public folder store are managed through property pages. Each public folder store exists on a specific server. The Public Folder Store object is found inside the container for that server in Exchange System Manager (see Figure 6.6). To access the store’s property pages, right-click the Public Folder Store object, and select Properties from the shortcut menu.
The public folder properties managed at the level of a public folder store govern the default settings for all public folders in that store. As with most other objects, the settings for the public folder store are managed through property pages. Each public folder store exists on a specific server. The Public Folder Store object is found inside the container for that server in Exchange System Manager (see Figure 6.6). To access the store’s property pages, right-click the Public Folder Store object, and select Properties from the shortcut menu.


![]() Most of the property pages for the public folder store are used to control the replication of public folders to other Exchange servers. These pages, and replication itself, are discussed later in the chapter. The one property page that is important now is named Limits, shown in Figure 6.7.
Most of the property pages for the public folder store are used to control the replication of public folders to other Exchange servers. These pages, and replication itself, are discussed later in the chapter. The one property page that is important now is named Limits, shown in Figure 6.7.


![]() When a user deletes a message from a folder, that message is marked as hidden and is actually kept on the server for a certain number of days before being permanently deleted. Within that period, called the deleted-item retention time, the user can recover the item. To do so, however, the user must be using Microsoft Outlook 8.03 or a later version. Outlook 2003 is considered to be version 11.0, Outlook XP is considered to be version 10.0, and so forth. Simply set the number of days that you want to keep deleted items on the server. The default setting is 0. In addition, you can specify that items not be permanently removed from the Information Store until at least one backup has occurred.
When a user deletes a message from a folder, that message is marked as hidden and is actually kept on the server for a certain number of days before being permanently deleted. Within that period, called the deleted-item retention time, the user can recover the item. To do so, however, the user must be using Microsoft Outlook 8.03 or a later version. Outlook 2003 is considered to be version 11.0, Outlook XP is considered to be version 10.0, and so forth. Simply set the number of days that you want to keep deleted items on the server. The default setting is 0. In addition, you can specify that items not be permanently removed from the Information Store until at least one backup has occurred.
![]() You can also use the Limits property page to set a default storage limit for public folders in a public folder store. This storage limit represents a size (in kilobytes) that the public folders can reach before a storage warning is issued to the folders’ contacts. You can override this storage limit at the folder level for individual folders, as you’ll see a bit later in the chapter.
You can also use the Limits property page to set a default storage limit for public folders in a public folder store. This storage limit represents a size (in kilobytes) that the public folders can reach before a storage warning is issued to the folders’ contacts. You can override this storage limit at the folder level for individual folders, as you’ll see a bit later in the chapter.
![]() The final limit that you can set on the Limits property page is the default number of days for which items are kept in the public folders for the public folder store. The default is no age limit at all.
The final limit that you can set on the Limits property page is the default number of days for which items are kept in the public folders for the public folder store. The default is no age limit at all.
| Note |
|
Examining Public Folder Store Subcontainers
![]() The Public Folder Store container in System Manager (refer to Figure 6.6) has a number of subcontainers that offer valuable information about your public store and the folders inside:
The Public Folder Store container in System Manager (refer to Figure 6.6) has a number of subcontainers that offer valuable information about your public store and the folders inside:
- The Logons container provides information about who is logged on and using public folders.
- The Public Folder Instances container lets you view the folders in a public store, configure properties of a folder (discussed in the next section), and configure replication of a folder (discussed later in the chapter).
![]() The Public Folders container provides details such as the path, size, and number of items inside the public folders in the store.
The Public Folders container provides details such as the path, size, and number of items inside the public folders in the store.
![]() The Replication Status container lists all folders and the number of servers that contain a replica of each folder. It also lists the current replication state and the time of the last replication. Replication of public folders is discussed later in the chapter.
The Replication Status container lists all folders and the number of servers that contain a replica of each folder. It also lists the current replication state and the time of the last replication. Replication of public folders is discussed later in the chapter.
![]() The Full-Text Indexing container shows the current state of the indexing of public folders in the store. This is covered in Chapter 9, “Configuring the Information Store.”
The Full-Text Indexing container shows the current state of the indexing of public folders in the store. This is covered in Chapter 9, “Configuring the Information Store.”
Configuring Public Folder Properties
![]() Public folders are also managed at the individual folder level in the Exchange System Manager console. This management is performed using the property pages of the folders themselves. As with the public folder store property pages, a number of the property pages for the folder deal with replication, which is discussed later. The two pages that are important here are the General and Limits pages.
Public folders are also managed at the individual folder level in the Exchange System Manager console. This management is performed using the property pages of the folders themselves. As with the public folder store property pages, a number of the property pages for the folder deal with replication, which is discussed later. The two pages that are important here are the General and Limits pages.
General Properties
![]() The General property page, shown in Figure 6.8, lets you change the description of the folder that appears in the GAL. You’ll also find an option named Maintain Per-User Read And Unread Information For This Folder. If you select this option, then the folder itself will keep track of and mark as read messages that each individual user of the folder has read. If a folder has been mail-enabled, as mentioned previously, another important setting is added to the General page. The Address List Name field governs whether you want the name that is visible in address books to be the same as the public folder name or a different name that you can enter.
The General property page, shown in Figure 6.8, lets you change the description of the folder that appears in the GAL. You’ll also find an option named Maintain Per-User Read And Unread Information For This Folder. If you select this option, then the folder itself will keep track of and mark as read messages that each individual user of the folder has read. If a folder has been mail-enabled, as mentioned previously, another important setting is added to the General page. The Address List Name field governs whether you want the name that is visible in address books to be the same as the public folder name or a different name that you can enter.


Limits Properties
![]() The Limits property page, shown in Figure 6.9, defines messaging limits for the public folder. You can define the following limits on this property sheet:
The Limits property page, shown in Figure 6.9, defines messaging limits for the public folder. You can define the following limits on this property sheet:
- Storage Limits indicate the amount of disk space, in kilobytes, a folder can take up before a warning is issued to the folder’s owner. This setting works the same way that the setting at the public folder store level works, as discussed previously. Any settings made at the public folder level override settings made for the server.
- Deletion Settings define the number of days that deleted messages are retained in the folder before being permanently removed. You can use the default defined for the public folder store level or override those settings for this particular folder.
- Age Limits set the maximum amount of time in days that a message remains in this public folder before it expires, or you can use the defaults set at the public folder store level.


0 comments
Post a Comment