
Creating and Monitoring Exchange Clusters
![]() The process to create any clustered resource, including an Exchange cluster, is a lengthy one, but one that can be completed effectively if you have prepared adequately ahead of time. The following list represents the basic, high-level steps that you must complete to create an Exchange Server 2003 cluster.
The process to create any clustered resource, including an Exchange cluster, is a lengthy one, but one that can be completed effectively if you have prepared adequately ahead of time. The following list represents the basic, high-level steps that you must complete to create an Exchange Server 2003 cluster.
| Note |
|
-
 Procure the required servers and storage device, making sure that all hardware is listed on the Hardware Compatibility List, located at www.microsoft.com/whdc/hcl/.
 - Install and configure the hardware as directed by the hardware vendor.
- Install Windows Server 2003 Enterprise Edition or Datacenter Edition on each server that will be part of the cluster.
- Join all servers that will be part of the cluster to the domain.
- Use the Windows Components Wizard to install the required services on each server, as discussed in Exercise 3.1.
- Configure the servers to support the shared storage device per the hardware vendor’s instructions.
- Configure the two network interfaces in each server to connect to the two different networks required. One network interface in each server will be part of the private network that is used for administrative traffic among cluster nodes, including the heartbeat. The other network interface will be part of the publicly accessible network that will service incoming client requests. These two networks should be on different subnets and not connected to each other in any way. Figure 4.4 provides a simplified illustration of how this will look.
- Prepare the Active Directory forest for the Exchange installation as discussed in Exercise 3.2.
- Prepare the Active Directory domain into which the cluster will be installed, as well as any other domains that will have Exchange users or Exchange administrators, as discussed in Exercise 3.3.
- Create a domain user account using Active Directory Users and Computers that will be used by the MSCS. The password on this account should be configured to never expire, although you can go back later and change the password as required by your organization’s security policies. This account will be used when the cluster is created and will be given special cluster-related rights.
- Verify that the cluster service is running on each server that will be a member of the cluster by opening the Cluster Administrator (located in the Administrative Tools folder). The cluster service must be operational before installing Exchange onto any server that will be a part of the cluster.
- Create the first member of the cluster, as discussed later in Exercise 4.1.
- Add the remaining servers to the cluster, as discussed later in Exercise 4.2.
- Install the Microsoft Distributed Transaction Coordinator as a cluster resource, as discussed later in Exercise 4.3.
- Completely install Exchange Server 2003 on the first node, as discussed in Exercise 3.4.
- Grant the cluster service account you created in Step 10 the Exchange Full Administrator permission, as discussed later in Exercise 4.4.
- Install Exchange Server 2003 on each of the remaining cluster nodes, as discussed previously in Exercise 3.4.
- Create an Exchange virtual server on each active cluster node, as discussed later in Exercise 4.5.


![]() With that high-level examination of the Exchange cluster creation process out of the way, we can now move forward into the more detailed subprocesses that are involved.
With that high-level examination of the Exchange cluster creation process out of the way, we can now move forward into the more detailed subprocesses that are involved.
Creating a Cluster
![]() Once you’ve gotten to this point, you’ve undoubtedly done your homework and are well prepared to create the cluster for your Exchange Server 2003 installation. As a last-minute checklist, be sure you have answers for the following questions:
Once you’ve gotten to this point, you’ve undoubtedly done your homework and are well prepared to create the cluster for your Exchange Server 2003 installation. As a last-minute checklist, be sure you have answers for the following questions:
- Which quorum model will you be using?
- Do you have a standard configuration and operating procedure for your shared storage device?
- Have you set aside the required IP addresses and hardware required to create the subnets for your private and public networks? (Each of these IP addresses should be statically configured.)
- Have you acquired the required static IP address for the cluster as a whole?
- Have you determined the NetBIOS cluster name? (This must be 15 characters or less.)
- Have you determined the failover and failback policies that you will need for your clustered resource?
![]() Exercise 4.1 walks through the required steps to create a new cluster.
Exercise 4.1 walks through the required steps to create a new cluster.
- On the first node, open the Cluster Administrator by selecting Start > All Programs > Administrative Tools > Cluster Administrator. You should see the Open Connection to Cluster dialog box.
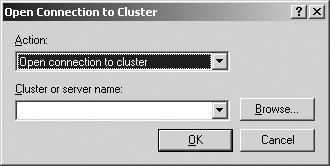
- If you do not see this dialog box, click the File menu and select Open Connection.
- From the Action drop-down, select Create New Cluster and then click OK. The New Server Cluster Wizard opens.
- Click Next to dismiss the opening page of the New Server Cluster Wizard.
- On the Cluster Name and Domain page, seen below, select the domain that the cluster will belong to. The default selection is the domain in which the cluster is located. You will also need to enter a NetBIOS-friendly cluster name in the Cluster Name box. Click Next.

- In the Select Computer page, seen below, select the server that will be the first node of the new cluster. By default, this is the computer on which you are performing the process. Click Next.

- The Analyzing Configuration page will appear, and the analysis process will run for a short period of time. When the process is done you may see an output similar to that shown below. Cautions indicate areas you may wish to investigate and correct if required. Warnings prevent the creation of the cluster. Click Next after viewing the output.

Note The analysis results shown here are consistent with the cluster creation process on a server that does not have an external shared storage device. - On the IP Address page, enter the IP address that is being assigned to the cluster itself. Click Next.
- On the Cluster Service Account page, enter the credentials for the domain user account that you created previously to act as the cluster service account. Click Next.
- On the Proposed Cluster Configuration page, you will be able to review the proposed configuration. Clicking the Quorum button will allow you change the type of quorum being used, if applicable. Click Next to create the cluster.
- Click Finish to complete the New Server Cluster Wizard. You will see your new single node cluster in the Cluster Administrator.


![]() That’s all there is to creating a new cluster and the first node in the cluster. Congratulations! Now it’s time to move on to adding additional nodes to the cluster. Exercise 4.2 shows the required steps to add a new node to an existing cluster.
That’s all there is to creating a new cluster and the first node in the cluster. Congratulations! Now it’s time to move on to adding additional nodes to the cluster. Exercise 4.2 shows the required steps to add a new node to an existing cluster.
- If it is not already open, open the Cluster Administrator. If the cluster does not appear in the Cluster Administrator, choose File > Open Connection and supply the required information to connect to the cluster.
- Right-click the cluster name in the Cluster Administrator and select New > Node from the context menu.
- Click Next to dismiss the opening page of the Add Nodes Wizard.
- On the Select Computers page, seen below, enter the names of the rest of the servers that are to be added to the cluster. Click Next.

- The Analyzing Configuration page will appear, and the analysis process will run for a short period of time. Click Next after viewing the output.
- On the Cluster Service Account page, enter the credentials for the domain user account that you created previously to act as the cluster service account. Click Next.
- On the Proposed Cluster Configuration page, you will be able to review the proposed configuration. Click Next.
- The Adding Nodes to the Cluster dialog box appears, detailing the status of the node addition. Click Next.
- Click Finish to complete the Add Nodes Wizard.

Configuring the Exchange Cluster
![]() After the cluster has been created and all nodes added, you are ready to begin installing Exchange Server 2003 on all nodes. Before you can do this, however, you must install the Microsoft Distributed Transaction Coordinator. Exercise 4.3 outlines the required steps to install the MSDTC.
After the cluster has been created and all nodes added, you are ready to begin installing Exchange Server 2003 on all nodes. Before you can do this, however, you must install the Microsoft Distributed Transaction Coordinator. Exercise 4.3 outlines the required steps to install the MSDTC.
- If it is not already open, open the Cluster Administrator. If the cluster does not appear in the Cluster Administrator, choose File > Open Connection and supply the required information to connect to the cluster.
- Expand the Groups container and right-click the Cluster Group item. Select New > Resource from the context menu.
- The New Resource dialog box opens, as seen below. Enter a name and description for the new resource. Select Distributed Transaction Coordinator from the Resource Type drop-down list and click Next.

- On the Possible Owners page, select the first server in the node and click Next.
- On the Dependencies page, select the cluster name and disk resource. Click Next.
- Click Finish.
- After the MSDTC resource appears in the Cluster Administrator, right-click it and select Bring Online.

![]() After you’ve created the MSDTC resource, you can install Exchange Server 2003 on the first node in the cluster, as discussed previously in Exercise 3.4. Once you have done this, complete the steps in Exercise 4.4 to grant the cluster service account the Exchange Full Administrator permission.
After you’ve created the MSDTC resource, you can install Exchange Server 2003 on the first node in the cluster, as discussed previously in Exercise 3.4. Once you have done this, complete the steps in Exercise 4.4 to grant the cluster service account the Exchange Full Administrator permission.
![]() You can now install Exchange Server 2003 on the remaining cluster nodes, one at a time, following the procedure discussed in Exercise 4.4. Once you’ve completed this step, you are ready to complete the Exchange cluster creation process by creating the Exchange virtual servers and associated resources. An Exchange virtual server consists of the following additional resources that, all together, make up a cluster resource group:
You can now install Exchange Server 2003 on the remaining cluster nodes, one at a time, following the procedure discussed in Exercise 4.4. Once you’ve completed this step, you are ready to complete the Exchange cluster creation process by creating the Exchange virtual servers and associated resources. An Exchange virtual server consists of the following additional resources that, all together, make up a cluster resource group:
- An IP address resource
- A network name resource
- A disk resource
- An Exchange 2003 System Attendant resource
- Open the Exchange System Manager.
- Right-click the organization name and select Delegate Control from the context menu. The Exchange Administration Delegation Wizard opens.
- Click Next to dismiss the opening page of the wizard.
- On the Users or Groups page, seen below, click the Add button to locate and grant the cluster service account the Exchange Full Administrator permission. Click Next.

- Click Finish to complete the Exchange Administration Delegation Wizard.

![]() Exercise 4.5 walks you through the required steps to create the Exchange virtual server and its related resources.
Exercise 4.5 walks you through the required steps to create the Exchange virtual server and its related resources.
- If it is not already open, open the Cluster Administrator. If the cluster does not appear in the Cluster Administrator, choose File > Open Connection and supply the required information to connect to the cluster.
- Right-click the Groups container and select New > Group from the context menu. The New Group dialog box, seen below, opens. Enter the name and description and click Next.

- On the Preferred Owners page, verify that no cluster nodes are listed in the Preferred Owners list and click Next.
- Click Finish. The new virtual server (also known as a cluster resource group) will be displayed under the Groups container, as seen below.

- To create the IP address resource, right-click the newly created virtual server and select New > Resource. The New Resource page opens.

- Enter a name and description for the resource. Select the IP Address option from the Resource Type drop-down and make sure the correct group is selected. Click Next.
- On the Possible Owners page, ensure that the first server in the node is listed in the Possible Owners list and click Next.
- On the Dependencies page, ensure that no resources are listed in the Resource Dependencies list and click Next.
- On the TCP/IP Address Parameters page, enter the statically assigned IP address and subnet mask that will be used as the IP address of the Exchange virtual server. This IP address, as with any other IP address, must be unique within your cluster and your network. Click Finish.
- To create the network name resource, right-click the virtual server again and select New > Resource from the context menu.
- On the New Resource page, enter the name and description. Select the Network Name option from the Resource Type drop-down and make sure the correct group is selected, as seen below. Click Next.

- On the Possible Owners page, ensure that the first server in the node is listed in the Possible Owners list and click Next.
- On the Dependencies page, ensure that the Exchange IP Address resource is listed in the Resource Dependencies list, as seen below, and click Next.

- On the Network Name Parameters page, seen below, enter a NetBIOS-friendly name and click Finish.

- To create the disk resource, right-click the virtual server again and select New > Resource from the context menu.
- On the New Resource page, enter the name and description. Select the Physical Disk option from the Resource Type drop-down, and make sure the correct group is selected. Click Next.
Note You will need a SCSI or Fibre Channel disk in order to be able to configure the Physical Disk resource. - On the Possible Owners page, ensure that the first server in the node is listed in the Possible Owners list and click Next.
- On the Dependencies page, ensure that no resources are listed in the Resource Dependencies list and click Next.
- On the Disk Parameters page, select the desired disk. Click Finish.
- Right-click the virtual server and select Bring Online from the context menu. Notice that the status icon of the virtual server changes briefly to Online Pending and then to Online.
- Right-click the virtual server and select New > Resource to create the Exchange System Attendant resource.
- On the New Resource page, enter the name and description. Select the Microsoft Exchange System Attendant option from the Resource Type drop-down, and make sure the correct group is selected. Click Next. After you’ve completed the steps in Exercise 4.5, you will need to repeat the same process on each node that will be in an active state within the cluster.
- On the Possible Owners page, ensure that the first server in the node is listed in the Possible Owners list and click Next.
- On the Dependencies page, ensure that the Network Name and Physical Disk resources are listed under the Resource Dependencies list and click Next.
- On the Data Directory page, verify that the data directory location points to the physical disk resource that has been assigned to this Exchange virtual server. This is the location that will be used by this Exchange virtual server to store the transaction log files, public folder store files, and mailbox store files.
- Click Finish.
- Bring the Exchange virtual server back online again.


Monitoring Exchange Clusters
![]() Once you’ve gone through all of the work to create and configure your Exchange cluster, you’ll undoubtedly want to perform some monitoring on it to ensure proper operation. For Active/Passive clusters, no real special monitoring need be performed over and above that for any other Exchange Server 2003 computer. For Active/Active clusters, you will want to pay special attention to the following two items that can indicate problems, both currently and in the future. If you monitor either, or both, of these conditions routinely occurring for periods of time greater than 10 minutes, you will need to move mailboxes off the servers:
Once you’ve gone through all of the work to create and configure your Exchange cluster, you’ll undoubtedly want to perform some monitoring on it to ensure proper operation. For Active/Passive clusters, no real special monitoring need be performed over and above that for any other Exchange Server 2003 computer. For Active/Active clusters, you will want to pay special attention to the following two items that can indicate problems, both currently and in the future. If you monitor either, or both, of these conditions routinely occurring for periods of time greater than 10 minutes, you will need to move mailboxes off the servers:
- The number of concurrent users accessing their mailboxes exceeds 1,900.
- The CPU load directly attributable to users accessing their mailboxes exceeds 40 percent.
![]() By their very nature, clusters are designed to be reliable and redundant in their operations. In most cases, you may never even notice a problem until a failover occurs. Should a node experience failover, you will want to examine the Event Logs immediately to try to locate any clues to the cause of the event.
By their very nature, clusters are designed to be reliable and redundant in their operations. In most cases, you may never even notice a problem until a failover occurs. Should a node experience failover, you will want to examine the Event Logs immediately to try to locate any clues to the cause of the event.
0 comments
Post a Comment