![]() One of an administrator’s most important tasks is to create and configure Exchange recipients. A recipient is an object in Active Directory that references a resource that can receive a message.
One of an administrator’s most important tasks is to create and configure Exchange recipients. A recipient is an object in Active Directory that references a resource that can receive a message.
![]() The resource might be a mailbox in a private Information Store, such as in the case of a user, or a public folder in the public Information Store that is shared by many users. No matter where an actual resource exists, though, a recipient object is always created in the Active Directory.
The resource might be a mailbox in a private Information Store, such as in the case of a user, or a public folder in the public Information Store that is shared by many users. No matter where an actual resource exists, though, a recipient object is always created in the Active Directory.
![]() In this chapter, we will discuss the types of Exchange recipients, their creation, and their properties. Exchange has four basic types of recipients:
In this chapter, we will discuss the types of Exchange recipients, their creation, and their properties. Exchange has four basic types of recipients:
![]() Users A user is an Active Directory object that typically represents a person who uses the network. Once Exchange is installed and updates the schema, each user in the Active Directory can be mailbox-enabled, mail-enabled, or neither. A mailbox-enabled user has an associated mailbox in a private Information Store on an Exchange server. Each user’s mailbox is a private storage area that allows an individual user to send, receive, and store messages. A mail-enabled user is one who has an e-mail address but does not have a mailbox on an Exchange server. These users send and receive e-mail by using an external ISP.
Users A user is an Active Directory object that typically represents a person who uses the network. Once Exchange is installed and updates the schema, each user in the Active Directory can be mailbox-enabled, mail-enabled, or neither. A mailbox-enabled user has an associated mailbox in a private Information Store on an Exchange server. Each user’s mailbox is a private storage area that allows an individual user to send, receive, and store messages. A mail-enabled user is one who has an e-mail address but does not have a mailbox on an Exchange server. These users send and receive e-mail by using an external ISP.
![]() Groups A group in Active Directory is like a container to which you can assign certain permissions and rights. You can then place users (and other groups) into that group, and they automatically inherit the group’s permissions and rights. Exchange uses the concept of mail-enabled groups to form distribution lists. Messages sent to a group are redirected and sent to each member of the group. These groups allow users to send messages to multiple recipients without having to address each recipient individually.
Groups A group in Active Directory is like a container to which you can assign certain permissions and rights. You can then place users (and other groups) into that group, and they automatically inherit the group’s permissions and rights. Exchange uses the concept of mail-enabled groups to form distribution lists. Messages sent to a group are redirected and sent to each member of the group. These groups allow users to send messages to multiple recipients without having to address each recipient individually.
![]() Contacts A contact is a pointer object that refers to an e-mail address for a non-Exchange recipient. Contacts are most often used for connecting your organization to foreign messaging systems, such as Microsoft Mail, Lotus cc:Mail, or the Internet. As an administrator, you would create contacts so that frequently used e-mail addresses are available in the Global Address List (GAL) as real names. This makes it easier to send mail because users do not need to guess at cryptic e-mail addresses.
Contacts A contact is a pointer object that refers to an e-mail address for a non-Exchange recipient. Contacts are most often used for connecting your organization to foreign messaging systems, such as Microsoft Mail, Lotus cc:Mail, or the Internet. As an administrator, you would create contacts so that frequently used e-mail addresses are available in the Global Address List (GAL) as real names. This makes it easier to send mail because users do not need to guess at cryptic e-mail addresses.
![]() Public folders A public folder is like a public mailbox. It is a container for information to be shared among a group of people. Public folders can contain e-mail messages, forms, word-processing documents, spreadsheet files, and files of many other formats. Public folders can also be configured to send information to other recipients.
Public folders A public folder is like a public mailbox. It is a container for information to be shared among a group of people. Public folders can contain e-mail messages, forms, word-processing documents, spreadsheet files, and files of many other formats. Public folders can also be configured to send information to other recipients.
![]() The rest of this chapter discusses the creation and configuration of these four recipient objects, as well as related management tasks.
The rest of this chapter discusses the creation and configuration of these four recipient objects, as well as related management tasks.
Users
![]() In previous versions of Exchange, such as Exchange Server 5.5, both the tool used to create user accounts (User Manager for Domains) and the tool used to administer Exchange (Exchange Administrator) could be used to create and manage mailboxes. This has changed in Exchange Server 2003. Now, one tool, named Active Directory Users and Computers, is used to create and manage mail-related user properties. Although the concept of the mailbox as a physical area of storage on an Exchange server is still valid, the concept of a mailbox as a recipient object in the Exchange directory no longer is. Now, there are only user objects in the Active Directory. Property pages of the user object are now used to configure Exchange-related properties.
In previous versions of Exchange, such as Exchange Server 5.5, both the tool used to create user accounts (User Manager for Domains) and the tool used to administer Exchange (Exchange Administrator) could be used to create and manage mailboxes. This has changed in Exchange Server 2003. Now, one tool, named Active Directory Users and Computers, is used to create and manage mail-related user properties. Although the concept of the mailbox as a physical area of storage on an Exchange server is still valid, the concept of a mailbox as a recipient object in the Exchange directory no longer is. Now, there are only user objects in the Active Directory. Property pages of the user object are now used to configure Exchange-related properties.
![]() This tying together of user accounts and mailbox properties means that Exchange administrators and Windows administrators will now have to work more closely than ever before. Though many Exchange administrators who have worked with Exchange Server 5.5 may hate the idea of giving up control of mailbox administration, this is usually what happens. Since all of the user-related functions of mailbox management are now accessed through Active Directory Users and Computers, it makes sense to have one account administrator handle all of the user-management details.
This tying together of user accounts and mailbox properties means that Exchange administrators and Windows administrators will now have to work more closely than ever before. Though many Exchange administrators who have worked with Exchange Server 5.5 may hate the idea of giving up control of mailbox administration, this is usually what happens. Since all of the user-related functions of mailbox management are now accessed through Active Directory Users and Computers, it makes sense to have one account administrator handle all of the user-management details.
![]() Exchange Server 2003 supports two mail configurations for a user: mailbox-enabled and mail-enabled. The creation and management of each type are discussed in the following sections.
Exchange Server 2003 supports two mail configurations for a user: mailbox-enabled and mail-enabled. The creation and management of each type are discussed in the following sections.
 Mailbox-Enabled Users
![]() Every user in an organization needs access to an Exchange-based mailbox in order to send and receive messages using the Exchange server. One of the principal administrative tasks in Exchange is the creation and management of these mailboxes. In Exchange Server 2003, a user with an associated mailbox is called a mailbox-enabled user. Mailbox-enabled users are able to send and receive messages, as well as store messages on an Exchange server.
Every user in an organization needs access to an Exchange-based mailbox in order to send and receive messages using the Exchange server. One of the principal administrative tasks in Exchange is the creation and management of these mailboxes. In Exchange Server 2003, a user with an associated mailbox is called a mailbox-enabled user. Mailbox-enabled users are able to send and receive messages, as well as store messages on an Exchange server.
Creating a Mailbox-Enabled User
![]() When the Active Directory forest is prepared for Exchange Server 2003, a number of important changes are made. One is that the Active Directory schema is updated with attributes for objects that relate to Exchange. Another important change is that the Active Directory Users and Computers snap-in is updated with extensions that allow the automatic creation of mailboxes whenever users are created. It is also easy to create mailboxes for existing users. Exercise 5.1 outlines the steps for creating a new user and an associated mailbox using Active Directory Users and Computers. Exercise 5.2 outlines the steps for creating a mailbox for an existing user. Both exercises assume that Exchange Server 2003 has previously been installed in the domain.
When the Active Directory forest is prepared for Exchange Server 2003, a number of important changes are made. One is that the Active Directory schema is updated with attributes for objects that relate to Exchange. Another important change is that the Active Directory Users and Computers snap-in is updated with extensions that allow the automatic creation of mailboxes whenever users are created. It is also easy to create mailboxes for existing users. Exercise 5.1 outlines the steps for creating a new user and an associated mailbox using Active Directory Users and Computers. Exercise 5.2 outlines the steps for creating a mailbox for an existing user. Both exercises assume that Exchange Server 2003 has previously been installed in the domain.
-
 Choose Start > Programs > Administrative Tools > Active Directory Users and Computers.
 -
 From the Action menu, point to New, and select User.
 -
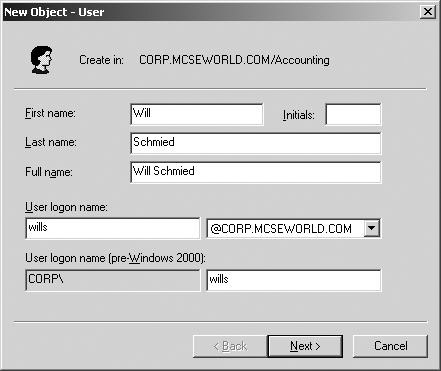
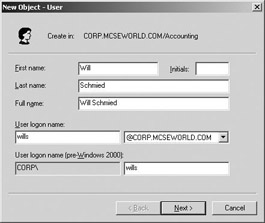
 On the New Object – User screen, seen below, fill in the information for the new user. This includes the user’s full name and logon name. When you have finished, click Next.
 -
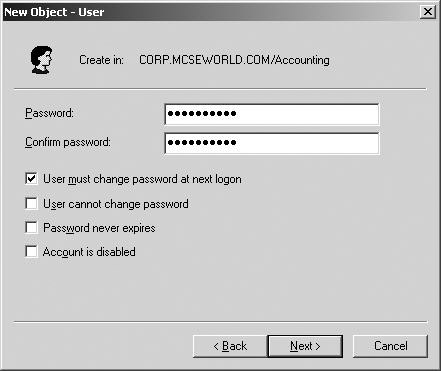
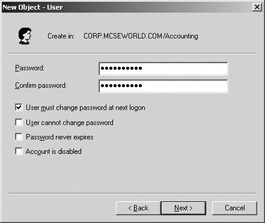
 On the next screen, enter and verify the user’s password, and set any password restrictions you want, as seen below. When you have finished, click Next.
 -
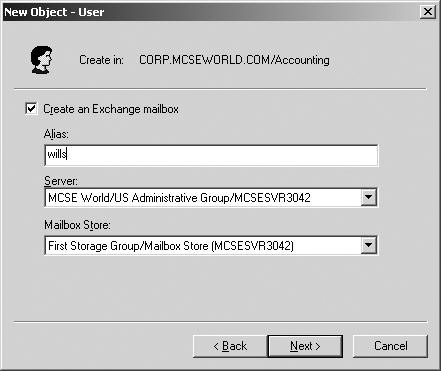
 Next, you are given the opportunity to create an Exchange mailbox for the user. To do so, first make sure the Create An Exchange Mailbox option is selected, as seen below.
 -
 An alias is suggested based on the logon name that you chose for the user. The alias is an alternate means of addressing a user that is used by foreign that may not be able to handle a full display name. You can change this if you have a specific policy in place for creating aliases, or you can leave it at the Windows default.
 -
 By default, the first Exchange server is selected as the server on which the mailbox should be created. Use the drop-down menu to change this if you want to create the mailbox on a different server.
 -
 Also by default, the first storage group on the selected server is chosen for you. Use the drop-down menu to alter that choice if desired. Once you have made your selections, click Next to go on.
 -
 A summary screen is now displayed asking you to confirm your choices. If you want to change any of the settings, you can use the Back button to do so. Once you are satisfied with your choices, click Finish to exit the wizard, create the new user object in the Active Directory, and create the new mailbox on the selected Exchange server.
-
 Choose Start > Programs > Administrative Tools > Active Directory Users And Computers.
 -
 In the Tree pane on the left, click the Users container.
 -
 In the Results pane on the right, find and select the user object for which you want to create a mailbox.
 -
 From the Action menu, select Exchange Tasks.
 -
 Click Next to bypass the Welcome screen of the wizard.
 -
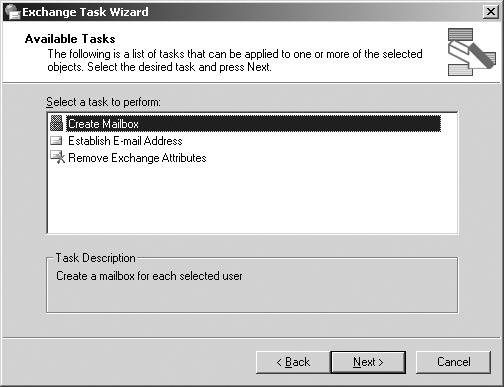
 On the Available Tasks screen, seen below, make sure that Create Mailbox is selected, and click Next.
 -
 On the Create Mailbox screen, make sure that the alias, server, and storage group selections are all appropriate, and then click Next.
 -
 A summary screen is now displayed asking you to confirm your choices. If you want to change any of the settings, you can use the Back button to do so. Once you are satisfied with your choices, click Next to create the mailbox.
 -
 After the mailbox has been completed, click Finish to exit the wizard.
Configuring Mailbox Properties
![]() A user object, like all objects, has properties. Those properties are configured and viewed through property pages and the individual attributes on those property pages. Mailbox properties are configured using several Exchange-related property pages of the user object. The property pages of a user object are accessed in one of two ways. With the user highlighted, you can use the Properties command on the Action menu to access the property pages. A quicker way is simply to double-click the user object.
A user object, like all objects, has properties. Those properties are configured and viewed through property pages and the individual attributes on those property pages. Mailbox properties are configured using several Exchange-related property pages of the user object. The property pages of a user object are accessed in one of two ways. With the user highlighted, you can use the Properties command on the Action menu to access the property pages. A quicker way is simply to double-click the user object.
![]() Many of the attributes that you can configure are straightforward and do not warrant much explanation (e.g., phone number). This section describes several of the property pages that pertain to the Exchange organization and the important individual attributes.
Many of the attributes that you can configure are straightforward and do not warrant much explanation (e.g., phone number). This section describes several of the property pages that pertain to the Exchange organization and the important individual attributes.
| Note |
|
General Page
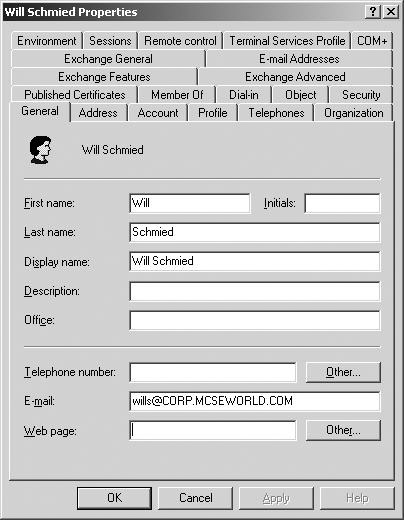
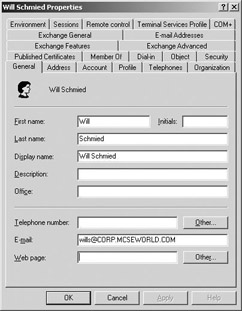
![]() The General page, shown in Figure 5.1, records general information about the user object. The first name, middle initial, and last name that you enter are used to generate a display name, which is the name of the recipient as it appears in the Active Directory Users and Computers window. The rest of the information on this page is used to further identify the recipient. All of this information is available to users when they browse the Global Address List from their e-mail client.
The General page, shown in Figure 5.1, records general information about the user object. The first name, middle initial, and last name that you enter are used to generate a display name, which is the name of the recipient as it appears in the Active Directory Users and Computers window. The rest of the information on this page is used to further identify the recipient. All of this information is available to users when they browse the Global Address List from their e-mail client.
Organization Page
![]() The Organization page contains fields for recording the organization information for the user, the name of the user’s manager, and the people who report to the user. These people are referred to as direct reports. All of these fields are optional. All the information configured on this property page is also available in the Global Address List.
The Organization page contains fields for recording the organization information for the user, the name of the user’s manager, and the people who report to the user. These people are referred to as direct reports. All of these fields are optional. All the information configured on this property page is also available in the Global Address List.
Address and Telephones Pages
![]() The Address and Telephones pages contain information on addresses and phone numbers, as well as a place for free-form notes about the user. All of this information is also available in the Global Address List.
The Address and Telephones pages contain information on addresses and phone numbers, as well as a place for free-form notes about the user. All of this information is also available in the Global Address List.
Exchange General Page
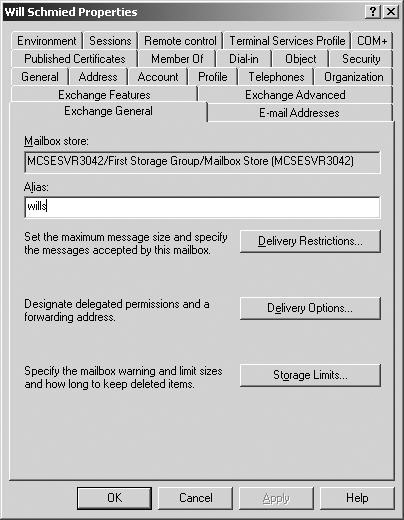
![]() The Exchange General page, shown in Figure 5.2, is used to configure general properties governing the Exchange mailbox associated with the user. The mailbox store that the user belongs to is displayed but cannot be changed. The alias is an alternate means of addressing a user that is used by foreign messaging systems that may not be able to handle a full display name.
The Exchange General page, shown in Figure 5.2, is used to configure general properties governing the Exchange mailbox associated with the user. The mailbox store that the user belongs to is displayed but cannot be changed. The alias is an alternate means of addressing a user that is used by foreign messaging systems that may not be able to handle a full display name.
![]() You will also find three buttons on this page that lead to more important settings: Delivery Restrictions, Delivery Options, and Storage Limits.
You will also find three buttons on this page that lead to more important settings: Delivery Restrictions, Delivery Options, and Storage Limits.
DELIVERY RESTRICTIONS
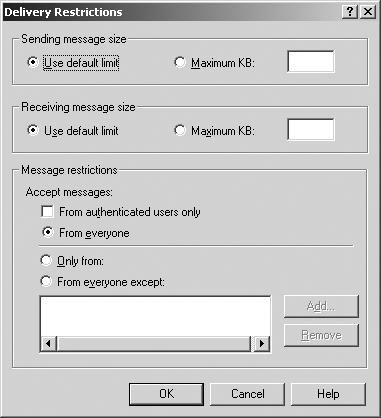
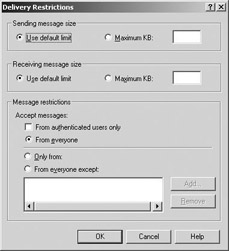
![]() The Delivery Restrictions dialog box, seen in Figure 5.3, contains information regarding from whom this mailbox will accept or reject messages. The default is to accept messages from everyone. In addition, you can configure size restrictions on incoming and outgoing messages on the mailbox.
The Delivery Restrictions dialog box, seen in Figure 5.3, contains information regarding from whom this mailbox will accept or reject messages. The default is to accept messages from everyone. In addition, you can configure size restrictions on incoming and outgoing messages on the mailbox.
DELIVERY OPTIONS
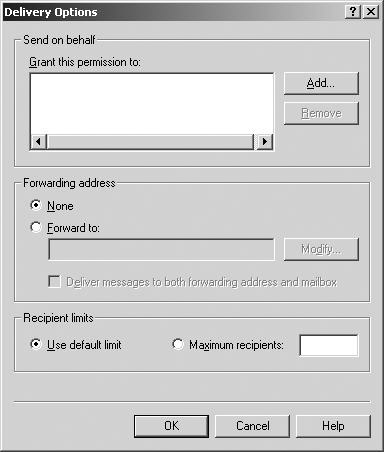
![]() The Delivery Options dialog box, seen in Figure 5.4, specifies a list of users who can send mail “on behalf of” this mailbox user. It also allows mail sent to this mailbox to be rerouted to another mailbox, referred to as an alternate recipient. You can configure the alternate recipient to receive mail instead of the original mailbox or along with the original mailbox.
The Delivery Options dialog box, seen in Figure 5.4, specifies a list of users who can send mail “on behalf of” this mailbox user. It also allows mail sent to this mailbox to be rerouted to another mailbox, referred to as an alternate recipient. You can configure the alternate recipient to receive mail instead of the original mailbox or along with the original mailbox.
| Note |
|
STORAGE LIMITS
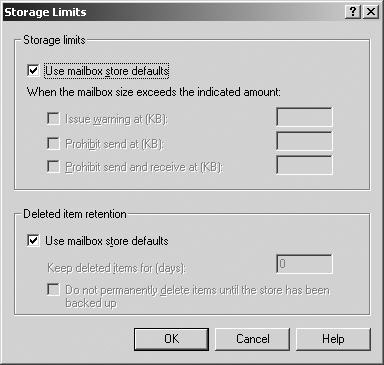
![]() The Storage Limits dialog box, seen in Figure 5.5, lets you set two parameters: storage limits and deleted item retention time. Storage limits refer to the limit placed on the size to which a mailbox can grow and what happens when that limit is crossed. By default, the Information Store (IS) settings will be used. However, this can be overridden. If it is overridden, you can set values (in kilobytes) for when warnings will be issued, when sending messages will be prohibited, and when sending and receiving messages will be prohibited.
The Storage Limits dialog box, seen in Figure 5.5, lets you set two parameters: storage limits and deleted item retention time. Storage limits refer to the limit placed on the size to which a mailbox can grow and what happens when that limit is crossed. By default, the Information Store (IS) settings will be used. However, this can be overridden. If it is overridden, you can set values (in kilobytes) for when warnings will be issued, when sending messages will be prohibited, and when sending and receiving messages will be prohibited.
![]() The deleted item retention feature enables mailbox users to retrieve deleted items. But to prevent excessive build-up of deleted items, Exchange allows you to set a retention time for deleted items. You can configure that length of time through this setting or at the IS object. The IS default value will be used, but you can configure a mailbox to override that setting by specifying the number of days for deleted item retention. You can also configure a mailbox to keep deleted items (i.e., not permanently deleted) until the mailbox has been backed up.
The deleted item retention feature enables mailbox users to retrieve deleted items. But to prevent excessive build-up of deleted items, Exchange allows you to set a retention time for deleted items. You can configure that length of time through this setting or at the IS object. The IS default value will be used, but you can configure a mailbox to override that setting by specifying the number of days for deleted item retention. You can also configure a mailbox to keep deleted items (i.e., not permanently deleted) until the mailbox has been backed up.
E-mail Addresses Page
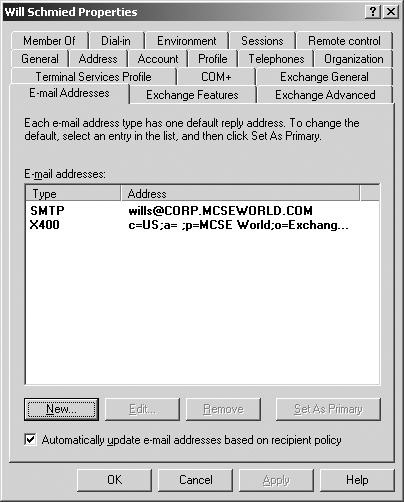
![]() Each time an Exchange mailbox is created, a number of non-Exchange mail addresses, also called foreign mail addresses or proxy addresses, are automatically generated for that Exchange mailbox. This allows Exchange mailboxes to be prepared to receive mail from foreign mail systems. The E-mail Addresses page, seen in Figure 5.6, lets you configure these addresses.
Each time an Exchange mailbox is created, a number of non-Exchange mail addresses, also called foreign mail addresses or proxy addresses, are automatically generated for that Exchange mailbox. This allows Exchange mailboxes to be prepared to receive mail from foreign mail systems. The E-mail Addresses page, seen in Figure 5.6, lets you configure these addresses.
![]() Microsoft Exchange can generate foreign addresses for the following systems, although by default it creates only X.400 and SMTP foreign addresses:
Microsoft Exchange can generate foreign addresses for the following systems, although by default it creates only X.400 and SMTP foreign addresses:
-
 Custom address
 -
 X.400 address
 -
 Microsoft Mail address
 -
 SMTP address
 -
 cc:Mail address
 -
 Lotus Notes address
 -
 Novell GroupWise address
Exchange Features Page
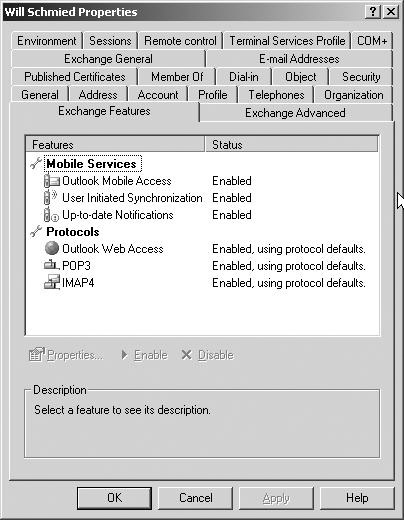
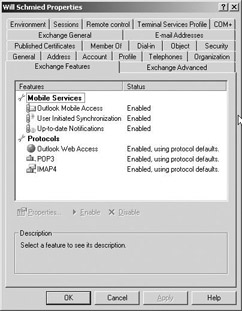
![]() The Exchange Features page, shown in Figure 5.7, lets you enable and disable advanced Exchange features for an individual mailbox. Such features include Outlook Mobile Access features, Outlook Web Access, and the ability to connect to the Exchange organization using various e-mail protocols.
The Exchange Features page, shown in Figure 5.7, lets you enable and disable advanced Exchange features for an individual mailbox. Such features include Outlook Mobile Access features, Outlook Web Access, and the ability to connect to the Exchange organization using various e-mail protocols.
Exchange Advanced Page
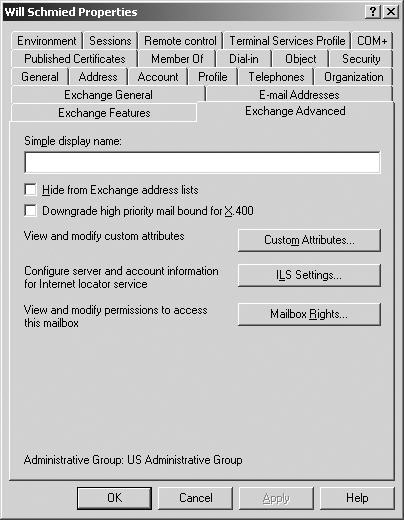
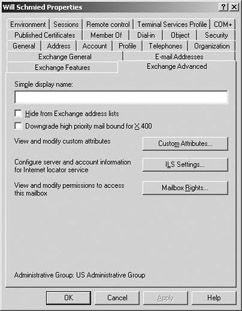
![]() The Exchange Advanced page, shown in Figure 5.8, lets you configure a number of miscellaneous features that the Exchange designers decided were advanced for one reason or another.
The Exchange Advanced page, shown in Figure 5.8, lets you configure a number of miscellaneous features that the Exchange designers decided were advanced for one reason or another.
![]() The simple display name is an alternate name for the mailbox. It appears when, for some reason, the full display name cannot. This situation often occurs when multiple language versions of System Manager are used on the same network.
The simple display name is an alternate name for the mailbox. It appears when, for some reason, the full display name cannot. This situation often occurs when multiple language versions of System Manager are used on the same network.
![]() By default, all recipients except public folders are visible to users via the Global Address List. You can use the Hide From Exchange Address Lists option to hide a mailbox from that list or other lists created in System Manager. The mailbox will still be able to receive mail; it just will not be included in address lists.
By default, all recipients except public folders are visible to users via the Global Address List. You can use the Hide From Exchange Address Lists option to hide a mailbox from that list or other lists created in System Manager. The mailbox will still be able to receive mail; it just will not be included in address lists.
![]() If you select the Downgrade High Priority Mail Bound For X.400 option, the current mailbox cannot send high-priority messages to X.400 systems. If a high-priority message is sent, it will automatically be downgraded to normal priority.
If you select the Downgrade High Priority Mail Bound For X.400 option, the current mailbox cannot send high-priority messages to X.400 systems. If a high-priority message is sent, it will automatically be downgraded to normal priority.
![]() In addition to the attributes just mentioned, three buttons lead to separate dialog boxes with more configuration options: Custom Attributes, ILS Settings, and Mailbox Rights.
In addition to the attributes just mentioned, three buttons lead to separate dialog boxes with more configuration options: Custom Attributes, ILS Settings, and Mailbox Rights.
CUSTOM ATTRIBUTES
![]() The Custom Attributes page lets you enter information about a mailbox in 15 custom fields. These fields can be used for any information that you need to include that isn’t available on the other property pages. For example, if your company uses a special employee identification numbering system, you could create a custom field for that number. These fields are available to users in the Global Address List only if they are using a special template that displays them or if they perform a specific LDAP query. By default, these fields are labeled extensionAttribute1 through extensionAttribute15, but they can be customized to suit your needs. Just select a field, and click Edit to enter a new value.
The Custom Attributes page lets you enter information about a mailbox in 15 custom fields. These fields can be used for any information that you need to include that isn’t available on the other property pages. For example, if your company uses a special employee identification numbering system, you could create a custom field for that number. These fields are available to users in the Global Address List only if they are using a special template that displays them or if they perform a specific LDAP query. By default, these fields are labeled extensionAttribute1 through extensionAttribute15, but they can be customized to suit your needs. Just select a field, and click Edit to enter a new value.
ILS SETTINGS
![]() Two fields on this page allow you to specify the server name of a Microsoft Internet Locator Service (ILS) and the account name (ILS account) for this mailbox. This is applicable if your network is using Microsoft NetMeeting for online meetings.
Two fields on this page allow you to specify the server name of a Microsoft Internet Locator Service (ILS) and the account name (ILS account) for this mailbox. This is applicable if your network is using Microsoft NetMeeting for online meetings.
MAILBOX RIGHTS
![]() This page allows you to view and configure the permissions that users and groups have for this mailbox. It should be noted that you could assign multiple users as the owners of a mailbox. This is useful when you want to create a mailbox that will be used by a group of people, such as a Help Desk department. A single mailbox could be created, and all users of that department could be made an owner of that mailbox.
This page allows you to view and configure the permissions that users and groups have for this mailbox. It should be noted that you could assign multiple users as the owners of a mailbox. This is useful when you want to create a mailbox that will be used by a group of people, such as a Help Desk department. A single mailbox could be created, and all users of that department could be made an owner of that mailbox.
![]() You can modify the particular rights of any user in the list by selecting the user and modifying the Allow and Deny check boxes beside the individual mailbox rights. Some of the more common rights that you can assign here are:
You can modify the particular rights of any user in the list by selecting the user and modifying the Allow and Deny check boxes beside the individual mailbox rights. Some of the more common rights that you can assign here are:
![]() The Delete Mailbox Storage right Allows a user to delete the actual mailbox from the Information Store. This right is given only to administrators by default.
The Delete Mailbox Storage right Allows a user to delete the actual mailbox from the Information Store. This right is given only to administrators by default.
![]() The Read Permissions right Lets the user read mail in the mailbox. You could use this right alone to allow a user to read another user’s mail but not send, change, or delete messages.
The Read Permissions right Lets the user read mail in the mailbox. You could use this right alone to allow a user to read another user’s mail but not send, change, or delete messages.
![]() The Change Permissions right Allows a user to delete or modify items in the primary user’s mailbox.
The Change Permissions right Allows a user to delete or modify items in the primary user’s mailbox.
![]() The Take Ownership right Allows a user to become the owner of a mailbox. By default, only administrators are given this permission.
The Take Ownership right Allows a user to become the owner of a mailbox. By default, only administrators are given this permission.
![]() The Full Mailbox Access right Allows a user to access a mailbox and read and delete messages. It also allows the user to send messages using the mailbox.
The Full Mailbox Access right Allows a user to access a mailbox and read and delete messages. It also allows the user to send messages using the mailbox.
Security Page
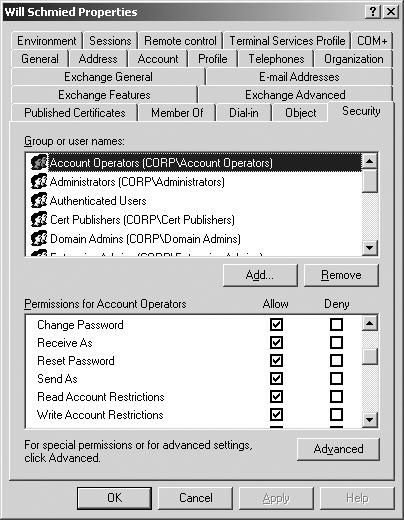
![]() The Security page, seen in Figure 5.9, lets you configure security options for the Active Directory object (in this case, a user account), including the Send As option. Previously this was configured using the Mailbox Rights page.
The Security page, seen in Figure 5.9, lets you configure security options for the Active Directory object (in this case, a user account), including the Send As option. Previously this was configured using the Mailbox Rights page.
| Note |
|
Member Of Page
![]() This page specifies the distribution groups of which this mailbox is a member. Not only can you manage a group from a user’s properties, but you can also manage a group from the group’s properties. For more information on distribution lists, see the section “Groups” later in this chapter.
This page specifies the distribution groups of which this mailbox is a member. Not only can you manage a group from a user’s properties, but you can also manage a group from the group’s properties. For more information on distribution lists, see the section “Groups” later in this chapter.
 Mail-Enabled Users
![]() A mail-enabled user is simply a user who has an e-mail address but not a mailbox on an Exchange server. This means that the user can receive e-mail through their custom address but cannot send mail using the Exchange system. You cannot mail-enable a user during account creation. The only way to create a mail-enabled user is first to create a new user that is not mailbox-enabled and then to enable mail for that user. Exercise 5.3 outlines the steps for mail-enabling a user.
A mail-enabled user is simply a user who has an e-mail address but not a mailbox on an Exchange server. This means that the user can receive e-mail through their custom address but cannot send mail using the Exchange system. You cannot mail-enable a user during account creation. The only way to create a mail-enabled user is first to create a new user that is not mailbox-enabled and then to enable mail for that user. Exercise 5.3 outlines the steps for mail-enabling a user.
-
 Click Start, point to Programs, point to Administrative Tools, and select Active Directory Users And Computers.
 -
 In the tree pane on the left, click the Users container.
 -
 In the right pane, find and select the user object for which you want to enable mail.
 -
 From the Action menu, select Exchange Tasks.
 -
 Click Next to dismiss the opening page of the Exchange Task Wizard.
 -
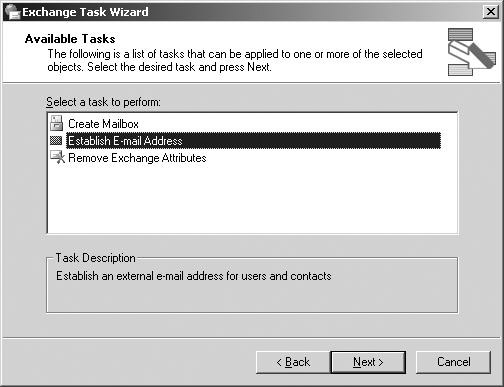
 Select the Establish E-mail Address option from the list, as seen below, and click Next.
 -
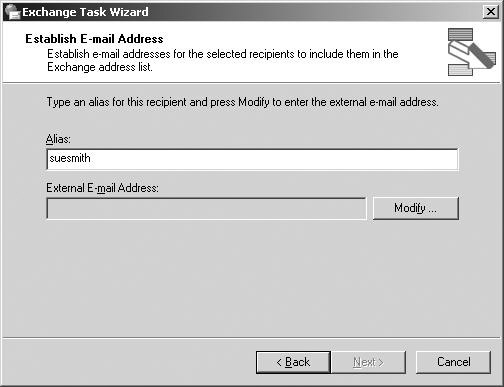
 On the Establish E-mail Address page, seen below, enter the desired alias for the user and then click the Modify button to create an e-mail address for the mail-enabled user.
 -
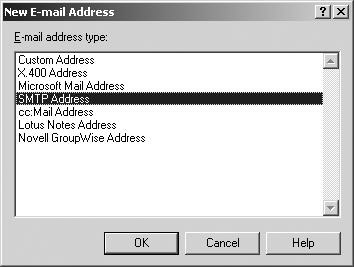
 The New E-mail Address dialog appears, as seen below, with a list of address types. From this list, select the type of e-mail address you want to create for the user, and click OK. For this exercise, we will create an SMTP e-mail address.
 -
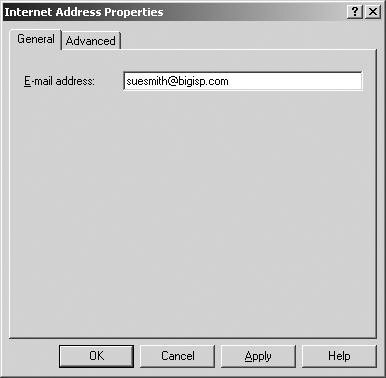
 The Internet Address Properties dialog opens, as seen below. On the General tab of the dialog, enter the e-mail address for the user.
 -
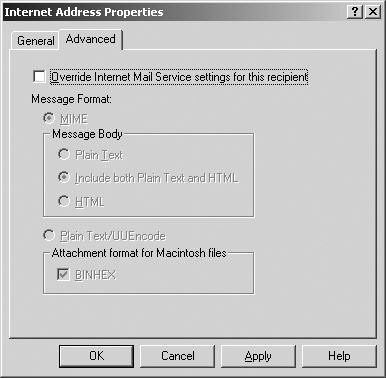
 You can configure advanced settings by switching to the Advanced tab, seen below. If desired you can override the Internet Mail Service default settings for the user by checking the Override Internet Mail Service Settings For This Recipient box and configuring your own message format settings. When you have finished, click OK.
 -
 You are now returned to the Exchange Task Wizard, and the new e-mail address appears in the appropriate field. Click Next to go on.
 -
 The Exchange Task Wizard will now mail-enable the user. When the process has completed you will be presented with a summary page. Click Finish to exit the wizard.
![]() Once you enable mail for a user following this procedure, you can configure the mail settings in the same way you would for a mailbox-enabled user.
Once you enable mail for a user following this procedure, you can configure the mail settings in the same way you would for a mailbox-enabled user.
| Note |
|

0 comments
Post a Comment